검색결과 리스트
Category에 해당되는 글 72건
- 2009.02.10 Datagrid 안에서 itemrenderer활용 샘플
- 2009.02.06 이클립스에서 정규식 사용하기
- 2009.02.06 Excel의 모든것!!
- 2009.02.05 메모리관리 cleanmem_v1.3.0
- 2009.02.05 ORACLE9I] DECODE, CASE WHEN THEN ELSE END
- 2009.02.03 itemEditor 이해와 커스텀 itemEditor 만들어보기
- 2009.02.02 ListBase기반 콤포넌트 이해
- 2009.01.30 AdvancedDataGrid row 속성 style 변경하기
- 2009.01.30 AdvancedDatagrid] Itemrenderer 활용
- 2009.01.29 Datagrid labelfuntion
글
Datagrid 안에서 itemrenderer활용 샘플
<?xml version="1.0" encoding="utf-8"?>
<mx:Application xmlns:mx="http://www.adobe.com/2006/mxml" xmlns:local="*"
width="450" height="370" verticalScrollPolicy="off" horizontalScrollPolicy="off"
backgroundColor="#FFFFFF">
<mx:Script>
<![CDATA[
import comp.MultiObject;
import mx.collections.ArrayCollection;
[Bindable]
public var initDG:ArrayCollection = new ArrayCollection([
new MultiObject(1, 'Test1', 1, false),
new MultiObject(2, 'Test2', 2, false),
new MultiObject(3, 'Test3', 3, false),
new MultiObject(4, 'Test4', 4, false),
new MultiObject(5, 'Test5', 5, false),
new MultiObject(6, 'Test6', 6, false),
new MultiObject(7, 'Test7', 7, false),
new MultiObject(8, 'Test8', 8, false),
new MultiObject(9, 'Test9', 9, false),
new MultiObject(10, 'Test10', 10, true),
new MultiObject(11, 'Test11', 11, false),
new MultiObject(12, 'Test12', 12, false),
new MultiObject(13, 'Test13', 13, false),
new MultiObject(14, 'Test14', 14, false),
new MultiObject(15, 'Test15', 15, false),
new MultiObject(16, 'Test16', 16, false),
new MultiObject(17, 'Test17', 17, false),
new MultiObject(18, 'Test18', 18, false),
new MultiObject(19, 'Test19', 19, false),
new MultiObject(20, 'Test20', 20, true)
]);
[Bindable] public var isEditable:Boolean = false;
[Bindable] public var totalData:String = "Total : ";
[Bindable] public var test:String = "test: ";
private function activateRadio():void {
isEditable = true;
}
private function deActivateRadio():void {
isEditable = false;
}
private var flag:Boolean = false;
public function checkAll():void {
if(flag) {
flag = false;
} else {
flag = true;
}
for(var idx:uint=0; idx<initDG.length; idx++) {
initDG[idx] = new MultiObject(initDG[idx].No, initDG[idx].Name, initDG[idx].CheckNum, flag);
}
}
]]>
</mx:Script>
<mx:DataGrid id="myGrid" dataProvider="{initDG}" headerHeight="50" variableRowHeight="false"
editable="true" width="450" height="300" >
<mx:columns>
<mx:DataGridColumn headerText="No" dataField="No" width="30"/>
<mx:DataGridColumn headerText="Name" dataField="Name"/>
<mx:DataGridColumn headerText="IsChecked" dataField="IsChecked" editable="true"/>
<mx:DataGridColumn headerText="Radio IR" dataField="IsChecked" editable="false">
<mx:itemRenderer>
<mx:Component>
<mx:HBox horizontalAlign="center" implements="mx.controls.listClasses.IDropInListItemRenderer">
<mx:Script>
<![CDATA[
import mx.controls.Alert;
import comp.MultiObject;
import mx.controls.DataGrid;
import mx.controls.dataGridClasses.DataGridListData;
import mx.controls.listClasses.BaseListData;
private var _listData:BaseListData;
public function get listData():BaseListData {
return _listData;
}
public function set listData( value:BaseListData ):void {
_listData = value;
}
private function changeRDO(evt:MouseEvent):void {
var myListData:DataGridListData = evt.target.parentDocument.listData;
var myDG:DataGrid = DataGrid(myListData.owner);
var idx:Number = Number(no.text)-1;
Alert.show(myDG.document.test);
for(var i:uint=0; i<myDG.document.initDG.length; i++) {
if(i == idx) {
myDG.document.initDG[i] = new MultiObject(myDG.document.initDG[i].No, myDG.document.initDG[i].Name,
myDG.document.initDG[i].CheckNum, true);
}else{
myDG.document.initDG[i] = new MultiObject(myDG.document.initDG[i].No, myDG.document.initDG[i].Name,
myDG.document.initDG[i].CheckNum, false);
}
}
}
]]>
</mx:Script>
<mx:Text id="no" text="{data.No}" visible="false" width="0"/>
<mx:RadioButton id="rdo" selected="{data.IsChecked}" click="changeRDO(event)"/>
</mx:HBox>
</mx:Component>
</mx:itemRenderer>
</mx:DataGridColumn>
<mx:DataGridColumn dataField="IsChecked" headerText="itemEditor" editorDataField="cbSelected">
<mx:itemEditor>
<mx:Component>
<mx:VBox backgroundColor="yellow" implements="mx.controls.listClasses.IDropInListItemRenderer">
<mx:Script>
<![CDATA[
import mx.events.FlexEvent;
import comp.MultiObject;
import mx.controls.DataGrid;
import mx.controls.dataGridClasses.DataGridListData;
import mx.controls.listClasses.BaseListData;
private var _listData:BaseListData;
public function get listData():BaseListData {
return _listData;
}
public function set listData( value:BaseListData ):void {
_listData = value;
}
public var cbSelected:Boolean;
override public function set data(value:Object):void {
if(value != null) {
super.data = value;
if (value.IsChecked == true) {
combo.selectedIndex = 0;
} else {
combo.selectedIndex = 1;
}
}
dispatchEvent(new FlexEvent(FlexEvent.DATA_CHANGE));
}
private function changeCombo(evt:Event):void {
var myListData:DataGridListData = evt.target.parentDocument.listData;
var myDG:DataGrid = DataGrid(myListData.owner);
var idx:Number = Number(no.text)-1;
for(var i:uint=0; i<myDG.document.initDG.length; i++) {
if(i == idx && evt.target.selectedIndex == 0) {
myDG.document.initDG[i] = new MultiObject(myDG.document.initDG[i].No, myDG.document.initDG[i].Name,
myDG.document.initDG[i].CheckNum, true);
} else {
myDG.document.initDG[i] = new MultiObject(myDG.document.initDG[i].No, myDG.document.initDG[i].Name,
myDG.document.initDG[i].CheckNum, false);
}
}
}
]]>
</mx:Script>
<mx:ComboBox id="combo" change="changeCombo(event)" updateComplete="cbSelected=combo.selectedItem.data" >
<mx:dataProvider>
<mx:Object label="true" data="true"/>
<mx:Object label="false" data="false"/>
</mx:dataProvider>
</mx:ComboBox>
<mx:Text id="no" text="{data.No}" visible="false" width="0"/>
</mx:VBox>
</mx:Component>
</mx:itemEditor>
</mx:DataGridColumn>
<mx:DataGridColumn dataField="IsChecked" headerText="CheckBox IR" editable="false" rendererIsEditor="true" >
<mx:itemRenderer>
<mx:Component>
<mx:HBox horizontalAlign="center" implements="mx.controls.listClasses.IDropInListItemRenderer">
<mx:Script>
<![CDATA[
import comp.MultiObject;
import mx.controls.DataGrid;
import mx.controls.dataGridClasses.DataGridListData;
import mx.controls.listClasses.BaseListData;
private var _listData:BaseListData;
public function get listData():BaseListData {
return _listData;
}
public function set listData( value:BaseListData ):void {
_listData = value;
}
private function changeCB(evt:MouseEvent):void {
var myListData:DataGridListData = evt.target.parentDocument.listData;
var myDG:DataGrid = DataGrid(myListData.owner);
myDG.document.initDG[Number(no.text)-1] = new MultiObject(myDG.selectedItem.No, myDG.selectedItem.Name,
myDG.selectedItem.CheckNum, evt.target.selected);
}
]]>
</mx:Script>
<mx:Text id="no" text="{data.No}" visible="false" width="0"/>
<mx:CheckBox id="cb" selected="{data.IsChecked}" click="changeCB(event)"/>
</mx:HBox>
</mx:Component>
</mx:itemRenderer>
</mx:DataGridColumn>
</mx:columns>
</mx:DataGrid>
<mx:HBox width="650" horizontalAlign="center">
<mx:Button label="Check All or None" click="checkAll()"/>
</mx:HBox>
</mx:Application>
설정
트랙백
댓글
글
이클립스에서 정규식 사용하기
a* a가 0 혹은 그 이상 발생할 때 일치 빈 문자열이나 'a', 'aa', 'aaa', 등
a+ a가 1번 이상 발생하면 일치 'a', 'aa', 'aaa', 등
a|b a 나 b면 일치 'a' 나 'b'
. 한개의 문자면 일치 'a', 'q', 'l', '_', '+', 등
[woeirjsd] 지정한 문자들 중 하나 이면 일치 'w', 'o', 'e', 'i', 'r', 'j', 's', 'd'
[1-9] 범위 안의 문자면 일치 '1', '2', '3', '4', '5', '6', '7', '8', '9'
[^13579] 지정한 문자 이외의 문자이면 일치 짝수 혹은 문자
(ie) 수식을 묶음 (다른 연산자와 사용하기 위함) 'ie'
^a 줄의 맨 처음에 a가 있으면 일치 'a'
a$ 줄의 맨 끝에 a가 있으면 일치 'a'
ex>
a(.*)b : a다음에 어떤한 글자가 와도 된다.
일치단어 : acvcvb, ab, ab343bkkk
정규표현식 (Regular Expressions)
PHP에서 정규표현식을 지원하는 함수로는 ereg(), eregi(), ereg_replace(), eregi_replace(), split(), spliti() 등이 있다. 이 때 ereg_replace 보다 preg_replace가 훨씬 빠르다고 한다.
이 외에도 펄 형식을 지원하는 정규표현식에 관련된 함수들도 있다.
1. 기초 (Basic Syntax)
First of all, let's take a look at two special symbols: '^ (start)' and '$ (end)'.
- "^The": matches any string that starts with "The";
- "of despair$": matches a string that ends in the substring "of despair";
- "^abc$": a string that starts and ends with "abc" -- that could only be "abc" itself!
- "notice": a string that has the text "notice" in it. "notice" 그 자체가 아닌 "notice"를 포함하는 것을 뜻한다.
There are also the symbols '* (zero or more)', '+ (one or more)', and '? (zero or one)', which denote the number of times a character or a sequence of characters may occur.
- "ab*": matches a string that has an a followed by zero or more b's ("a", "ab", "abbb", etc.);
- "ab+": same, but there's at least one b ("ab", "abbb", etc.);
- "ab?": there might be a b or not;
- "a?b+$": a possible a followed by one or more b's ending a string.
You can also use bounds, which come inside braces and indicate ranges in the number of occurences:
- "ab{2}": matches a string that has an a followed by exactly two b's ("abb");
- "ab{2,}": there are at least two b's ("abb", "abbbb", etc.);
- "ab{3,5}": from three to five b's ("abbb", "abbbb", or "abbbbb").
- "ab{0,}" → "ab*"
- "ab{1,}" → "ab+"
- "ab{0,1}" → "ab?"
Now, to quantify a sequence of characters, put them inside parentheses:
- "a(xxyy)*": matches a string that has an a followed by zero or more copies of the sequence "xxyy";
- "a(bc){1,5}": one through five copies of "bc."; ("abc", "abcbc" , "abcbcbc", "abcbcbcbc", or "abcbcbcbcbc")
There's also the '|' symbol, which works as an OR operator:
- "hi|hello": matches a string that has either "hi" or "hello" in it;
- "(b|cd)ef": a string that has either "bef" or "cdef";
- "(a|b)*c": a string that has a sequence of alternating a's and b's ending in a c; ("ac", "bc", or "c")
A period ('.') stands for any single character:
- "a.[0-9]": matches a string that has an a followed by one character and a digit; ("ax1", "ak7", etc.)
- "^.{3}$": a string with exactly 3 characters.
- "^(100)(\.[0-9]{1,2})?$" : "100"이거나 100 다음에 소수점이 있다면 첫째나 둘째자리까지 있다.
Bracket expressions specify which characters are allowed in a single position of a string:
- "[ab]": matches a string that has either an a or a b (that's the same as "a|b");
- "[a-d]": a string that has lowercase letters 'a' through 'd' (that's equal to "a|b|c|d" and even "[abcd]");
- "^[a-zA-Z]": a string that starts with a letter;
- "[0-9]%": a string that has a single digit before a percent sign;
- ",[a-zA-Z0-9]$": a string that ends in a comma followed by an alphanumeric character.
You can also list which characters you DON'T want -- just use a '^' as the first symbol in a bracket expression (i.e., "%[^a-zA-Z]%" matches a string with a character that is not a letter between two percent signs).
- "[^abc]": a, b, 또는 c를 제외한 문자.
- "[^0-9]: 숫자를 제외한 문자.
특수문자에 해당하는 문자 사용하기
\ 는 특수 문자를 문자 자체로 해석하도록 하는 Escape 문자로 사용된다. ? 자체를 찾으려고 하면 \? 와 같이 사용되어야 한다.\ 를 사용해야 하는 문자로는 ^ \ | [] () {} . * ? + 가 있다. 이 문자들을 문자 자체로 해석을 하기위해서는
\^ \\ \| \[ \( \{ \. \* \? \+ 등과 같이 사용해야 한다.
In order to be taken literally, you must escape the characters "^.[$()|*+?{\" with a backslash ('\'), as they have special meaning.
On top of that, you must escape the backslash character itself in PHP3 strings, so, for instance, the regular expression "(\$|?[0-9]+" would have the function call: ereg("(\\$|?[0-9]+", $str) (what string does that validate?)
Just don't forget that bracket expressions are an exception to that rule--inside them, all special characters, including the backslash ('\'), lose their special powers (i.e., "[*\+?{}.]" matches exactly any of the characters inside the brackets). And, as the regex man pages tell us: "To include a literal ']' in the list, make it the first character (following a possible '^'). To include a literal '-', make it the first or last character, or the second endpoint of a range."
예를 들어 what?이라는 물음표로 끝나는 문자를 찾고 싶다고, egrep 'what?' ...이라고 하면 ?이 특수문자이므로 wha를 포함한 whale도 찾게 된다. 또, 3.14로 찾을때는 3+14 등도 찾게 된다.
특수문자가 [] 안과 밖에서 다르다는 점을 생각하여 각각의 경우를 살펴보자. 우선 [] 밖의 경우는,
- \을 특수문자 앞에 붙이기. 예, "what\?", "3\.14"
- []을 사용하기. 예, "what[?]", "3[.]14"
첫번째 방법은 보통 escape라고 부르며, 특수문자 앞에 \을 붙여서 특수문자의 특수한 기능을 제거한다. 두번째 방법은 [] 밖의 많은 특수문자들이 [] 안에서는 일반문자가 되는 점을 이용한 것이다. 보통 첫번째 방법을 많이 사용한다.
이 때 \도 뒤에 나오는 특수문자를 일반문자로 만드는 특수문자이기 때문에, 문자 그대로의 \을 나타내려면 \\을 사용해야 한다. 물론 [\]도 가능하다.
[] 안의 특수문자는 위치를 바꿔서 처리한다. 먼저, ^는 [^abc]와 같이 처음에 나와야만 의미가 있으므로 [abc^]와 같이 다른 위치에 사용하면 된다. -는 [a-z]와 같이 두 문자 사이에서만 의미가 있으므로 [-abc]나 [abc-]와 같이 제일 처음이나 마지막에 사용한다. (grep과 같이 도구에 따라 역으로 일반 문자앞에 \를 붙여서 특수문자를 만드는 경우가 있다.)
For completeness, I should mention that there are also collating sequences, character classes, and equivalence classes. I won't be getting into details on those, as they won't be necessary for what we'll need further down this article. You should refer to the regex man pages for more information.
character class의 예
- [[:alpha:]] → [a-zA-Z]
- [[:digit:]] → [0-9]
- [[:alnum:]] → [0-9a-zA-Z]
- [[:space:]] → 공백문자
2. 응용 예제
lidating Money Strings
Ok, we can now use what we've learned to work on something useful: a regular expression to check user input of an amount of money. A quantity of money can be written in four ways we can consider acceptable: "10000.00" and "10,000.00", and, without the cents, "10000" and "10,000". Let's begin with:
^[1-9][0-9]*$
That validates any number that doesn't start with a 0. But that also means the string "0" doesn't pass the test. Here's a solution:
^(0|[1-9][0-9]*)$
"Just a zero OR some number that doesn't start with a zero." We may also allow a minus sign to be placed before the number:
^(0|-?[1-9][0-9]*)$
That means: "a zero OR a possible minus sign and a number that doesn't start with a zero." Ok, let's not be so strict and let the user start the number with a zero. Let's also drop the minus sign, as we won't be needing it for the money string. What we could do is specify an optional decimal fraction part in the number:
^[0-9]+(\.[0-9]+)?$
It's implicit in the highlited construct that a period always comes with at least one digit, as a whole set. So, for instance, "10." is not validated, whereas "10" and "10.2" are.
^[0-9]+(\.[0-9]{2})?$
We specified that there must be exactly two decimal places. If you think that's too harsh, you can do the following:
^[0-9]+(\.[0-9]{1,2})?$
That allows the user to write just one number after the period. Now, as for the commas separating the thousands, we can put in:
^[0-9]{1,3}(,[0-9]{3})*(\.[0-9]{1,2})?$
"A set of 1 to 3 digits followed by zero or more sets of a comma and three digits." Easy enough, isn't it? But let's make the commas optional:
^([0-9]+|[0-9]{1,3}(,[0-9]{3})*)(\.[0-9]{1,2})?$
That's it. Don't forget that the '+' can be substituted by a '*' if you want empty strings to be accepted also (why?). And don't forget to escape the backslash for the function call (common mistake here). Now, once the string is validated, we strip off any commas with str_replace(",", "", $money) and typecast it to double so we can make math with it.
Validating E-mail Addresses
Ok, let's take on e-mail addresses. There are three parts in an e-mail address: the POP3 user name (everything to the left of the '@'), the '@', and the server name (the rest). The user name may contain upper or lowercase letters, digits, periods ('.'), minus signs ('-'), and underscore signs ('_'). That's also the case for the server name, except for underscore signs, which may not occur.
Now, you can't start or end a user name with a period, it doesn't seem reasonable. The same goes for the domain name. And you can't have two consecutive periods, there should be at least one other character between them. Let's see how we would write an expression to validate the user name part:
^[_a-zA-Z0-9-]+$
That doesn't allow a period yet. Let's change it:
^[_a-zA-Z0-9-]+(\.[_a-zA-Z0-9-]+)*$
That says: "at least one valid character followed by zero or more sets consisting of a period and one or more valid characters."
To simplify things a bit, we can use the expression above with eregi(), instead of ereg(). Because eregi() is not sensitive to case, we don't have to specify both ranges "a-z" and "A-Z" -- one of them is enough:
^[_a-z0-9-]+(\.[_a-z0-9-]+)*$
For the server name it's the same, but without the underscores:
^[a-z0-9-]+(\.[a-z0-9-]+)*$
Done. Now, joining both expressions around the 'at' sign, we get:
^[_a-z0-9-]+(\.[_a-z0-9-]+)*@[a-z0-9-]+(\.[a-z0-9-]+)*$
Microsoft .NET framework의 RegularExpressionValidate 컨트롤에서는
^[_a-zA-Z0-9]+([-+.][_a-zA-Z0-9]+)*@[_a-zA-Z0-9]+([-.][_a-zA-Z0-9]+)*\.[_a-zA-Z0-9]+([-.][_a-zA-Z0-9]+)*$
이렇게 쓰고있다. 이게 더 정확한 듯 하다. 위의 것은 '-'으로 시작하는 것을 허용하는데 이것은 그렇지 않다.
주민등록번호
주민등록번호는 "6자리의 숫자 - (1|2|3|4)로 시작하는 7자리의 숫자" 의 형태로 되어있다.
[0-9]{6}-(1|2|3|4)[0-9]{6}
자연수 및 유리수
<script language="javascript">
<!--
function realCheck(Str) {
      var fooPat=/^[1-9][0-9]*(\.[0-9]+)?$/
      var matchArray=Str.match(fooPat)
      if (matchArray==null) {return false;}
      return true;
}

function positiveIntCheck(Str) {
      var fooPat=/^[1-9][0-9]*$/
      var matchArray=Str.match(fooPat)
      if (matchArray==null) {return false;}
      return true;
}
//-->
</script>
URL 주소
URL주소의 형식은 www.aaa.net 과 같으며 영숫자 . \ ? & _ = ~ + 등으로 이루어져 있다.
[0-9a-zA-Z_]+(\.[0-9a-zA-Z/\?_=+~]+)*
(http|ftp|https):/{2}[0-9a-zA-Z_]+(\.[0-9a-zA-Z/\?_=+~]+)*
E-mail 기타 등등
if(!eregi("^([[:alnum:]_%+=.-]+)@([[:alnum:]_.-]+)\.([a-z]{2,3}|[0-9]{1,3})$",$email))
{
    echo "잘못된 email address 다.";
}

if(!ereg("([^[:space:]])",$name)) {
echo("<script>alert('이름을 입력하세요!');history.go(-1)</script>");
exit;
}

if(!ereg("([a-zA-Z0-9]+)@([a-zA-Z0-9])([.a-zA-Z0-9]+)([a-zA-Z0-9])$",$email)) {
echo("<script>alert('올바른 E-Mail 주소가 아닙니다.');history.go(-1)</script>");
exit;
}

if(!ereg("(^[0-9a-zA-Z]{4,8}$)",$passwd)) {
echo("<script>alert('비밀번호는 4자에서 8자까지의 영문자 또는 숫자로 입력하세요!');history.go(-1)
</script>");
exit;
}

if(!ereg("([^[:space:]])",$title)) {
echo("<script>alert('제목을 입력하세요!');history.go(-1)</script>");
exit;
}
Other uses
Extracting Parts of a String
ereg() and eregi() have a feature that allows us to extract matches of patterns from strings (read the manual for details on how to use that). For instance, say we want do get the filename from a path/URL string -- this code would be all we need:
ereg("([^\\/]*)$", $pathOrUrl, $regs);
echo $regs[1];
Advanced Replacing
ereg_replace() and eregi_replace() are also very useful: suppose we want to separate all words in a string by commas:
ereg_replace("[ \n\r\t]+", ",", trim($str));
찾은문자열 사용하기
정규식을 이용하여 문자열을 찾는 함수는 ereg()와 eregi() 함수이다. 이 함수 문자열에서 찾고자 하는 문자의 패턴이 있는지 확인할 수 있다. 그런데 문자열이 존재하는지 확인만하고 어떤 문자열을 찾았는지 볼수 있는 방법은 없을까?
→ ereg("a(b*)(c+)", "abbbbcccd", $reg);
다음과 같이 세번째 인자를 주면 주어진 패턴과 일치하는 문자열을 구할수 있다. 그럼 $reg 에는 어떤것들이 저장되어있을까 ? $reg는 배열의 형태로 반환이 된다.
$reg[0] 에는 주어진 전체 패턴인 a(b*)(c+)에 대한 내용이 들어간다. 위의 함수 결과에서는 abbbbccc 가 된다.
$reg[1]에는 첫 번째 (b*) 에 해당하는 bbbb가 들어간다.
$reg[2]에는 두 번째 ()인 (c+) 에 해당하는 ccc가 들어가게 된다.
그러면 ()안에 또 ()가 들어가면 어떤 식으로 해석이 될까?
만약에 (a+(a*))a(b+(c*))라는 패턴이 있으면 어떤 식으로 들어가게 될 지를 알아보자.
먼저 $reg[0]에는 전체 패턴인 (a+(a*))a(b+(c*))에 대한 내용이 들어간다.
$reg[1]에는 첫 번째 큰 ()인 (a+(a*)) 에 대한 내용이 들어가고, $reg[2] 에는 이 괄호 안에 있는 작은 괄호 (a*) 에 대한 내용이 들어간다. $reg[3], $reg[4] 에는 각각 (b+(c*)), (c*)의 내용이 들어가게 된다.
정규식을 이용한 문자열 치환
정규 표현식을 이용하여 문자열을 치환하는 함수는 ereg_replace()와 eregi_replace() 함수가 있다.
두 함수의 차이점은 eregi_replace()의 경우에는 영문자의 대소문자 구분을 하지 않는것이다.
$str = "test test"; // 두 개의 test 사이에는 4개의 스페이스가 있다.
&str = ereg_replace(" "," ", $str);
이 명령의 실행결과로 $str = "test test"; 가 된다.
이는 내용을 출력할 때 많이 사용되는 구문이다. 그럼 문자열 치환시에 문자열 패턴을 사용할 경우 찾아낸 문자열들을 다시 사용할 방법은 어떤 것이 있는가?
이럴 때 사용되는 것들이 \\0, \\1, \\2, ... 등이다.
다음과 같은 패턴이 있다고 하자.
([_0-9a-zA-Z]+(\.[_0-9a-zA-Z]+)*)@([0-9a-zA-Z]+(\.[0-9a-zA-Z]+)*)
이런 패턴이 있을 경우 전체가 \\0이 된다.
\\1은 ([_0-9a-zA-Z]+(\.[_0-9a-zA-Z]+)*) 이 된다. \\2는 \.[_0-9a-zA-Z]+)이 된다. \\3은 ([0-9a-zA-Z]+(\.[0-9a-zA-Z]+)*) 이 되고 \\4는 (\.[0-9a-zA-Z]+)이 된다.
다음과 같은 구문이 있을 경우:
$mail = "abc@abc.net";
$pattern = "([_0-9a-zA-Z]+(\.[_0-9a-zA-Z]+)*)@([0-9a-zA-Z]+(\.[0-9a-zA-Z]+)*)";
$link = ereg_replace($pattern, "<a href = 'mailto:\\0'>\\0</a>",$mail);
결과는 <a href='mailto:abc@abc.net'>abc@abc.net</a>
이 된다.
Some exercises
Now here's something to make you busy:
- modify our e-mail-validating regular expression to force the server name part to consist of at least two names (hint: only one character needs to be changed);
- build a function call to ereg_replace() that emulates trim();
- make up another function call to ereg_replace() that escapes the characters '#', '@', '&', and '%' of a string with a '~'.
설정
트랙백
댓글
글
Excel의 모든것!!
엑셀2000 함수 및 기능 총 망라하여 정리되어있습니다.
출처는 알수가 없습니다. 문제시 되면 연락주세요!
설정
트랙백
댓글
글
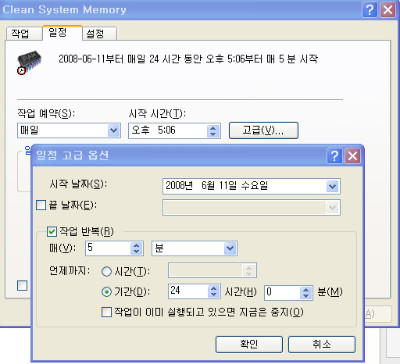
메모리관리 cleanmem_v1.3.0
이 프로그램에 대해서 간단하게 설명해드리면 메모리 관리하는 프로그램입니다.
프로그램 사용수 빈도가 높거나 멀티태스킹 작업이 잦은 사용자들에게 추천할만한 프로그램입니다.
프로그램사용후 닫기를 누르게되면 프로세서종료와 함게 메모리를 반환해야 하는데 그런부분에 있어서 누수가 발생하게
되는데 그런 부분을 자동적으로 관리해주는 프로그램입니다.
간단한 메모리관리 cleanmem_v1.3.0 프로그램설정법입니다.
설치를 하게되면 단축아이콘 그런것들은 설치되지않습니다.
1. 아래 그림처럼 내컴퓨터 - 제어판 - 예약된 작업으로 가시면됩니다.

2. Clean System Memory 클릭 하면 프로그램설정부분 활성화
3. 아래화면이 나타나면 일정탭에서 고급을 누르게되면 일정 고급옵션이 활성화됩니다.
거기서 작업반복부분에 시간을 설정하게되면 설정한 시간간격으로 메모리누수를
확인해서 메모리를 관리해주게 됩니다.
저는 개인적으로 5분정도 설정하였습니다. 무난한듯싶네요
설정
트랙백
댓글
글
ORACLE9I] DECODE, CASE WHEN THEN ELSE END
===================================================================================================================
DECODE(기준컬럼,조건값1,변경값1,조건값2,변경값2) AS 컬럼명
SELECT deptno,
DECODE(deptno, 10 , 'ACCOUNTING' ,
20 , 'RESEARCH' ,
30 , 'SALES' ,
40 , 'OPERATIONS')
FROM emp ;
===================================================================================================================
===================================================================================================================
CASE WHEN 조건절 THEN TRUE일경우값 ELSE FALSE 일경우값 END AS 컬럼명
CASE 기준컬럼 WHEN 조건값 THEN TRUE일경우값 ELSE FALSE 일경우값 END AS 컬럼명
EX>
SELECT DEPTNO, CASE WHEN DEPTNO='10' THEN '10번부서' ELSE (CASE WHEN DEPTNO='20' THEN '20번부서' ELSE '30번부서' END) END AS DEPTRENAME
FROM EMP
===================================================================================================================
설정
트랙백
댓글
글
itemEditor 이해와 커스텀 itemEditor 만들어보기
데이터 그리드에서 편집기능을 사용할때 우리는 보통 editable 속성값을 true 로 셋팅한것만으로 편하게
바인딩된 원 데이터를 마음대로 수정이 가능했습니다.
또 다른 방법으로 우리는 itemEditor 를 일반적인 컨트롤 컴포넌트들의 클래스 네임을 적어줌으로서 편하게(?) 작업이 가능했습니다.
하지만 그보다 복잡한 형태의 itemEditor 을 사용해야한다면 어떻게 해야할까?
아래 소스는 가장 복잡한 형태의 커스텀 itemEditor 을 사용함으로서 itemEditor 가 갖추어야할것들을 모두 표시 해주고 있습니다.
소스는 itemEditor 의 베이스 클래스를 HBOX 로 선언해주었습니다.
실제 itemEditor 가 기본적으로 갖추어야 할 것은
mx.controls.listClasses.IDropInListItemRenderer 인터페이스와
get listData , set listData
속성입니다. 그리고 set Data 에서의
dispatchEvent(new FlexEcent(FlexEvent.DATA_CHANGE)); 와 listData 의 [Bindable("datachange")] 또한
필수 입력 사항들입니다. 그렇다면 왜? 이것들이 필요한것일까? 이유는 간단합니다. 이미 IDropInListItemmRenderer 의 인터페이스를 가진 컨트롤들은 이미 선언이 되어 있기 때문입니다. 위의 내용들은 해당 컴포넌트가 ItemRenderer 또는 ItemEditor 에 사용되었을경우 ListBase 로 부터 데이터를 가져오기 위해 선언된 것일 뿐입니다. 레퍼런스의 IDropInListItemmRenderer 를 찾아보면 좀 더 자세한 설명을 얻으실수 있습니다. DataGridColumn 쪽을 살펴보면 editorDataField = 'text' 라고 적혀있습니다. text 는 기본값이지만 설명을 위해 적어 두었습니다. editorDataField 는 데이터의 필드가 아닌 itemRenderer , itemEditor 간의 데이터 통신을 위한 속성을 지칭하는것입니다. 우리는 기본컨트롤과의 통신을 위해 text 속성을 그대로 유지하고 바꾸지는 않겠습니다. 아래 보시면 set text 와 get text 가 보일겁니다. set text는 여기서 전혀 사용되지않지만 get text 는 itemRenderer 로 데이터를 보내주기 위해 콤보박스의 text 값을 보내주게 만들었습니다. 이전에 itemRenderer 를 설명할때 listData -> set data -> set text 로 실행된다고 하였지만. 그것은 IDropInListItemmRenderer 인터페이스를 가진 기본적인 컨트롤들의 set data 내부에서 set text 를 호출하였지만. 우리가 만든 커스텀 itemEditor 에는 그럴필요가 없기에 그냥 두었습니다. import mx.collections.ArrayCollection; <mx:DataGrid id="grid" width="300" dataProvider="{dataSet}" editable="true"> </mx:Application>
<mx:Application xmlns:mx="http://www.adobe.com/2006/mxml" layout="vertical">
<mx:Script>
<![CDATA[
import mx.utils.ObjectUtil;
[Bindable] private var dataSet:ArrayCollection = new ArrayCollection([
{label:"http://blog.naver.com/mash9"},
{label:"blog"},
{label:"naver"},
{label:"com"},
{label:"mash9"}
]);
[Bindable] public var combo:ArrayCollection = new ArrayCollection(ObjectUtil.copy(dataSet.source) as Array);
]]>
</mx:Script>
<mx:columns>
<mx:DataGridColumn dataField="label" editorDataField="kkkk">
<mx:itemEditor>
<mx:Component>
<mx:HBox implements="mx.controls.listClasses.IDropInListItemRenderer">
<mx:Script>
<![CDATA[
import mx.controls.Alert;
import mx.events.FlexEvent;
import mx.controls.listClasses.BaseListData;
private var property:String;
override public function set data(value:Object):void
{
super.data = value;
for(var i:Number = 0 ; i < cb.dataProvider.length ; i++)
if(cb.dataProvider[i][property] == value[property])
{
cb.selectedIndex = i;
break;
}
dispatchEvent(new FlexEvent(FlexEvent.DATA_CHANGE));
}
[Bindable("dataChange")]
private var _listData:BaseListData;
public function get listData():BaseListData
{
return _listData;
}
public function set listData(value:BaseListData):void
{
property = value["dataField"];
_listData = value;
}
public function set kkkk(value:String):void
{
//"not use"
}
public function get kkkk():String
{
return cb.text;
}
]]>
</mx:Script>
<mx:Label text="select:"/>
<mx:ComboBox id="cb" dataProvider="{outerDocument.combo}"/>
</mx:HBox>
</mx:Component>
</mx:itemEditor>
</mx:DataGridColumn>
</mx:columns>
</mx:DataGrid>
출처 : http://blog.naver.com/mash9 블로그 닫힌문님
설정
트랙백
댓글
글
ListBase기반 콤포넌트 이해
ListBase기반의 콤포넌트중 List 콤포넌트의 대한 간단한 예제이다.
아래 내용중에 참고해야될 부분이 빨간색부분 event.itemRenderer.data.url1 이다.
List콤포넌트에 dataProvider 로 ArrayCollection을 바인딩시킨후 ListEvent이벤트를 통해서
List콤포넌트에 바인딩된 dataProvider의 데이타 접근할수가 있다.
ListBase계열을 상속받은 콤포넌트들은 ListBase의 data라는 프로퍼티를통해서 원시데이타에 접근할수있기때문이다.
따라서 itemRednderer.data 는 하나의 item을 가르키게 되고 원하는값을 뽑아낼수있다.
Datagrid나 Tree역시 비슷하다..
<?xml version="1.0"?>
<mx:Application xmlns:mx="http://www.adobe.com/2006/mxml" height="500">
<mx:Script>
<![CDATA[
[Bindable]
[Embed(source='assets/m2.jpg')]
private var m1:Class;
[Bindable]
[Embed(source='assets/m2.jpg')]
private var m2:Class;
[Bindable]
[Embed(source='assets/m3.jpg')]
private var m3:Class;
import mx.events.ListEvent;
private function fnRollOver(event:ListEvent):void {
sLoader.source= event.itemRenderer.data.url1;
}
private function fnRollOut(event:ListEvent):void {
sLoader.source=""
}
]]>
</mx:Script>
<mx:ArrayCollection id="dpd">
<mx:source>
<mx:Object label="오만과 편견" icon="{m1}" url1="http://imgmovie.naver.com/mdi/mit500/0447/D4728-00.jpg" />
<mx:Object label="캐리비안의 해적" icon="{m2}" url1="http://imgmovie.naver.com/mdi/mit500/0436/D3679-01.jpg"/>
<mx:Object label="러브 액츄얼리" icon="{m3}" url1="http://imgmovie.naver.com/mdi/mit500/0368/C6843-00.jpg"/>
</mx:source>
</mx:ArrayCollection>
<mx:List id="lData"
dataProvider="{dpd}"
width="230"
itemRollOut="fnRollOut(event);"
itemRollOver="fnRollOver(event);"
fontSize="12"
height="71"/>
<mx:SWFLoader id="sLoader" width="230" height="330"/>
</mx:Application>
설정
트랙백
댓글
글
AdvancedDataGrid row 속성 style 변경하기
private var dpADG:ArrayCollection = new ArrayCollection([
{Artist:'Pavement', Album:'Slanted and Enchanted', Price:11.99},
{Artist:'Pavement', Album:'Brighten the Corners', Price:11.99},
{Artist:'Saner', Album:'A Child Once', Price:11.99},
{Artist:'Saner', Album:'Helium Wings', Price:12.99},
{Artist:'The Doors', Album:'The Doors', Price:10.99},
{Artist:'The Doors', Album:'Morrison Hotel', Price:12.99},
{Artist:'Grateful Dead', Album:'American Beauty', Price:11.99},
{Artist:'Grateful Dead', Album:'In the Dark', Price:11.99},
{Artist:'Grateful Dead', Album:'Shakedown Street', Price:11.99},
{Artist:'The Doors', Album:'Strange Days', Price:12.99},
{Artist:'The Doors', Album:'The Best of the Doors', Price:10.99}
]);
public function myColStyleFunc(data:Object,
col:AdvancedDataGridColumn):Object
{
if(data["Price"] <= 11.00)
return {color:0x00FF00};
return null;
}
<mx:AdvancedDataGridColumn dataField="Price"
styleFunction="myColStyleFunc"/>
설정
트랙백
댓글
글
AdvancedDatagrid] Itemrenderer 활용
<?xml version="1.0"?>
<!-- dpcontrols/adg/HierarchicalADGSimpleRenderer.mxml -->
<mx:Application xmlns:mx="http://www.adobe.com/2006/mxml" width="500" height="150">
<mx:Script>
<![CDATA[
import mx.collections.ArrayCollection;
[Bindable]
public var OrexhComboData:ArrayCollection = new ArrayCollection(
[
{Region:"CICAGO", Territory_Rep:10,Actual:10,Estimate:20},
{Region:"SEOUL", Territory_Rep:100,Actual:100,Estimate:10},
{Region:"TEXAS", Territory_Rep:10,Actual:12,Estimate:34}
] );
]]>
</mx:Script>
<mx:AdvancedDataGrid width="100%" height="100%" dataProvider="{OrexhComboData}" sortExpertMode="true">
<mx:columns>
<mx:AdvancedDataGridColumn dataField="Region" width="70"/>
<mx:AdvancedDataGridColumn dataField="Territory_Rep"
headerText="Territory Rep" width="100"/>
<mx:AdvancedDataGridColumn dataField="Actual" width="70"/>
<mx:AdvancedDataGridColumn dataField="Estimate" width="70"/>
<mx:AdvancedDataGridColumn id="diffCol"
headerText="Difference"/>
</mx:columns>
<mx:rendererProviders>
<mx:AdvancedDataGridRendererProvider column="{diffCol}"
renderer="SummaryRenderer"/>
</mx:rendererProviders>
</mx:AdvancedDataGrid>
</mx:Application>
<?xml version="1.0"?>
<!-- dpcontrols/adg/myComponents/SummaryRenderer.mxml -->
<mx:Label xmlns:mx="http://www.adobe.com/2006/mxml" textAlign="center">
<mx:Script>
<![CDATA[
override public function set data(value:Object):void
{
var diff:Number =
Number(value["Actual"]) - Number(value["Estimate"]);
// 다른필드데이타필드로부터 값얻어오는방법 value["필드명"]
if (diff < 0)
{
setStyle("color", "red");
text = "Undersold by " + usdFormatter.format(diff);
}
else
{
setStyle("color", "green");
text = "Exceeded estimate by " + usdFormatter.format(diff);
}
}
]]>
</mx:Script>
<mx:CurrencyFormatter id="usdFormatter" precision="2"
currencySymbol="$" decimalSeparatorFrom="."
decimalSeparatorTo="." useNegativeSign="true"
useThousandsSeparator="true" alignSymbol="left"/>
</mx:Label>
설정
트랙백
댓글
글
Datagrid labelfuntion
이 옵션은 db로부터 데이타값을 받고 datagrid에 바인딩시킬때 원하는 포멧형식을 지정해줄때 사용하면 좋을듯하다.
일반적으로 db로부터 리턴받는 타입에 따라서 item부분을 Object 혹은 xml로 리턴받게된다.
상황에 따라서 선택적으로 사용하면될듯..
public static function labelFuncDateFormat(item:Object,column:DsDataGridColumn):String{
var strVal:String = "";
var tmpStr:String = item[column.dataField] as String;
if(tmpStr == "" || tmpStr == null){
strVal = "";
else if(tmpStr.length > 8){
strVal = tmpStr.substr(0,4)+"-"+tmpStr.substr(4,2)+"-"+tmpStr.substr(6,2);
}
return strVal;
}
<mx:DataGridColumn headerText="현재날짜"
textAlign="left"
dataField="EDITDATE" labelFunction=" labelFuncDateFormat"/>


RECENT COMMENT