검색결과 리스트
struts에 해당되는 글 7건
- 2008.07.31 struts2] struts2 + ibatis 활용한 게시판1-3
- 2008.07.30 struts2] struts2 + ibatis 활용한 게시판1-2
- 2008.07.30 struts2] Interceptor
- 2008.07.30 struts2] struts2 + ibatis 활용한 게시판1-1
- 2008.07.29 struts2] Download
- 2008.07.29 struts2] multi upload
- 2008.07.29 struts2] single upload
글
struts2] struts2 + ibatis 활용한 게시판1-3
struts2 + ibatis 를 활용한 게시판
* 게시판 글쓰기 및 수정, 파일업로드 기능
1. bbs.xml
- 글 작성하기 위해 <insert>추가 및 sql문 정의
- 파라미터를 여러개 받아야 하기 때문에 parameterClass를 객체로 지정한다.
즉, 여기서는 위에 정의한 alias인 bbsvo로 지정하면 된다.
- insert에 idx로 이용되는 컬럼명은 sequence로 가져와야하기 때문에
dual table을 이용해서 미리 시퀀스 값을 가져온다.
-<selectKey>속성인 resultClass은 실행했을때 리턴되는값을 명시
keyProperty에 idx가 아래의insert절의 #idx#에 맵핑된다.
2. Bbs.java
- interface에 메소드 정의
3. BbsImple.java
- interface에 정의된 메소드를 구현
- insert절은 insert, delete절은 delete, select은 queryForList 호출
-
4. struts.xml
- 1. add 액션추가
- 2. add_ok action 추가
5.write.jsp
- action에서 result로 write.jsp를 호출하였기때문에 해당 페이지에서 글작성할수있는 페이지 작성
- insertForm.jsp페이지를 해당 폼으로 설정
<s:form action="add_ok" method="post" enctype="multipart/form-data">
<s:include value="insertForm.jsp"></s:include>
</s:form>
6. insertForm.jsp
- struts2의 taglib를 이용해서 글보기시 session에 사용자 및 글제목등 관련 필드 내용을 session에
등록한다.
이렇게 하는이유는 insertForm.jsp 하나의 폼을 가지고 delete 및 uptate시에도 동일 폼을 사용하기
때문에 세션으로부터 그 폼을 가져와서 재활용하려고 하는것이다. 이렇게되면 delete.jsp 같은
페이지를 동일한 폼을 만들지 않아도 되고 글 상세보기시 session에 폼에 대한 data를 세션에 등록
한다. 그렇게 되면 수정버튼을 클릭시 db로부터 값을 불러오지 않고 세션에 등록된 값을 가져와서
글쓴이,제목,내용등을 사용자에게 보여줄수있는 것이다.
7.AddAction 클래스 정의
- struts.xml에서 정의한 클래스 및 메서드 정의(AddAction.java / clear()) - 1.add action
- write.jsp에서 action으로 정의한 struts.xml에 action등록 - 2. add_ok action
- 파일업로드시 File변수명+FileName 이라고 해야 Struts2에서 자동으로 파일명을 인식한다.
ex> File s_file 파일명얻어내기 : s_fileFileName
- AddAction클래스가 호출되면 필드로 선언된 변수에 값이 셋팅이 되고 난후에 execute()메서드가
호출된다.
8.FileService.java
- 파일업로드를 하기 위한 FileService 파일 작성
- 아래 fileupload에서 한 예제를 가지고 그대로 사용하면된다.
* bbs.xml
<insert id="insertBbs" parameterClass="bbsvo">
<selectKey keyProperty="idx" resultClass="int">
select BBS_idx.NEXTVAL AS idx FROM dual
</selectKey>
<!--
resultClass 이것을 실행했을때 리턴되는것 명시
keyProperty에 idx가 아래의insert절의 #idx#에 맵핑된다.
-->
insert into BBS_T(idx,subject,writer,writedate,contents,s_file,pwd,readhit,ip)
values (<!-- 아래서 전달되는 변수는 parameterClass에서 찾는다. -->
#idx#,#subject#,#writer#,sysdate,#contents#,#s_file#,#pwd#,#readHit#,#ip#
<!-- getSubject(),getWriter()이런 메소드가 호출되면서 파라미터에 맵핑된다. -->
)
</insert>
* Bbs.java
- interface에 메소드 정의
public void addBbs(BbsVO n);
* BbsImple.java
public void addBbs(BbsVO n) {
insert("insertBbs",n); //insert(ag id값, 넘겨줄인자값)
}
* struts.xml
<action name="add" class="action.AddAction" method="clear">
<result>/write.jsp</result>
</action>
<action name="add_ok" class="action.AddAction">
<result name="input">/list.jsp</result>
<result type="redirect-action" name="success">list</result>
</action>
*write.jsp
<%@ taglib prefix="s" uri="/struts-tags" %>
<html>
<head>
<meta http-equiv="Content-Type" content="text/html; charset=UTF-8">
<link rel="StyleSheet" href="/css/style.css" type="text/css">
<link rel="StyleSheet" href="text.css" type="text/css">
<s:head/> <!-- taglib가 가지고 있는 head값 -->
</head>
<body>
<s:form action="add_ok" method="post" enctype="multipart/form-data">
<s:include value="insertForm.jsp"></s:include> //insertForm.jsp를 해당페이지에 폼으로 include
</s:form>
</body>
</html>
* insertForm.jsp
<%@page contentType="text/html" pageEncoding="UTF-8"%>
<%@ taglib prefix="s" uri="/struts-tags" %>
<table width="100%" border="0" cellspacing="0" cellpadding="0">
<tr>
<td valign="top">
<table width="100%" border="0" cellspacing="0" cellpadding="0">
<tr>
<td align="center" height="10"></td>
</tr>
<tr>
<td align="center"><u><b>BBS 글쓰기</b></u></td>
</tr>
<tr>
<td align="center" valign="top"><table width="100%" border="0" cellspacing="0" cellpadding="0">
<tr>
<td> </td>
</tr>
</table>
<table width="556" border="0" cellspacing="0" cellpadding="0">
<tr>
<td height="2" bgcolor="#C3C3C3"></td>
</tr>
<tr>
<td bgcolor="#E5E5E5"><table width="100%" border="0" cellspacing="1" cellpadding="2">
<tr>
<td width="90" height="20" align="center" bgcolor="#669AB3">
<s:text name="작성자"/>
</td>
<td bgcolor="#F2F7F9" align="left">
<s:textfield name="writer" value="%{#session.selectBoard.writer}" cssStyle="width:100px" theme="simple"/>
</td>
</tr>
<tr>
<td height="20" align="center" bgcolor="#669AB3"><s:text name="제목"/></td>
<td bgcolor="#F2F7F9" align="left"><s:textfield name="subject" value="%{#session.selectBoard.subject}" cssStyle="width:450px" theme="simple"/></td>
</tr>
<tr>
<td height="20" align="center" bgcolor="#669AB3"><s:text name="내용"/></td>
<td bgcolor="#F2F7F9" align="left"><s:textarea name="contents" value="%{#session.selectBoard.contents}" cssStyle="width: 450px; height: 200px" theme="simple"/></td>
</tr>
<tr>
<td height="20" align="center" bgcolor="#669AB3"><s:text name="첨부파일"/></td>
<td bgcolor="#F2F7F9" align="left"><s:file name="s_file" cssStyle="width:300px" theme="simple"/>
</td>
</tr>
<tr>
<td height="20" align="center" bgcolor="#669AB3"><s:text name="비밀번호"/></td>
<td bgcolor="#F2F7F9" align="left"><s:password name="pwd" cssStyle="width:200px" theme="simple"/>
<font color="#0066CC">* 삭제.수정시 필요</font> </td>
</tr>
</table></td>
</tr>
</table>
<table width="556" border="0" cellspacing="0" cellpadding="0">
<tr>
<td height="20" valign="middle"><img src="/images/sub_it/point_line.gif" width="556" height="3"></td>
</tr>
<tr>
<td align="right"> <table width="100%" border="0" cellspacing="0" cellpadding="0">
<tr>
<td width="315" align="center">
</td>
<td width="241" align="right"> <s:submit src="images/but_submit.gif" theme="simple"/>
<s:reset theme="simple"/>
</td>
</tr>
</table></td>
</tr>
</table></td>
</tr>
<tr>
<td height="19"></td>
</tr>
</table>
</td>
</tr>
</table>
*AddAction.java
package action;
import java.io.File;
import java.util.Map;
import javax.servlet.Servlet;
import org.apache.struts2.ServletActionContext;
import service.FileService;
import vo.BbsVO;
import com.opensymphony.xwork2.ActionContext;
import dao.Bbs;
import dao.DaoService;
public class AddAction {
String writer,subject,contents,pwd;
File s_file;
String s_fileFileName,serverFullPath; //s_fileFileName이라고 작성해야 된다.
public String clear() throws Exception{
/*현재 사용되고 있는 session정보 가져오기*/
Map<String,BbsVO> map = ActionContext.getContext().getSession();
map.clear();
return "success";
}
public String execute() throws Exception{
/*ibatis의 Dao객체 얻기*/
Bbs bbs = (Bbs)DaoService.getDao(Bbs.class);
BbsVO vo = new BbsVO(); //ibatis에서 인자로 vo를 받기때문에 값을 셋팅하고 인자로 넣어준다.
vo.setWriter(writer);
vo.setSubject(subject);
vo.setContents(contents);
vo.setS_file(s_fileFileName);
vo.setReadHit(0);
vo.setPwd(pwd);
vo.setIp(ServletActionContext.getRequest().getRemoteAddr());
String basePath="D:/jspwork/Struts2_ibatis/WebContent/upload"; //저장할경로 설정
FileService fs = new FileService(); //서버에 파일을 저장시키위해 객체생성
serverFullPath = fs.saveFile(s_file, basePath, s_fileFileName); // 서버에 저장(파일객체,저장경로,파일명)
bbs.addBbs(vo); //위에서 셋팅한 vo객체를 ibatis 인자로 넘겨준다(이런방식으로 여러개의 파라미터를 전달할수있다)
return "success";
}
// 일반적인 setter//getter 메소드 정의
}
설정
트랙백
댓글
글
struts2] struts2 + ibatis 활용한 게시판1-2
struts2 + ibatis 를 활용한 게시판
* DB로 부터 글 목록불러오기 및 페이징처리 part
*ListAction.java
- execute()메서드에 ibatis에 정의된 Bbs bbs = (Bbs)DaoService.getDao(Bbs.class)를 명시할시
ListAction클래스가 불려지면서 ibatis와 연동을 시킬수가 있다.
- execute()메서드안에 db로부터 가져온 결과를 가지고 게시판을 구축하면된다.
- Paging클래스를 따로 작성해서
package action;
import java.util.*;
import page.Paging;
import vo.BbsVO;
import com.opensymphony.xwork2.ActionContext;
import com.opensymphony.xwork2.ActionSupport;
import dao.Bbs;
import dao.DaoService;
public class ListAction extends ActionSupport{
/*
* pojo기반으로 사용하게되면 session처리하기가 곤란하다.
* 따라서 ActionSupport를 상속받아 처리한다.
* */
private ArrayList<BbsVO> arr_list; //모든 게시물
private List<BbsVO> list; //현재 페이지에서 보여질 게시물
private int nowPage = 1;
private int rowTotal; // 전체 게시물의 수
private int blockList; // 한 페이지당 보여질 게시물의 수
private int blockPage; // 한번에 보여지는 페이지수
private String pagingCode;
private Paging page ; // 페이지 기법을 구현하는 클래스
@Override
public String execute() throws Exception {
/*
* 세션객체 구하기
* 이것은 나중에 게시물 보기시 히트 수를 증가해 주기 위한것으로 이미 한번 읽은것은
* 히트 수를 증가하지 않도록 하는데 있어 필요하다.
* */
Map<String, BbsVO> map = ActionContext.getContext().getSession(); //세션객체를 맵으로 리턴
map.clear(); //session 청소
/* ibatis를 통한 게시물 받기 위해서는 우선 Dao객체가 필요하다. */
/*
* dao.xml에 Bbs라는것이 선언되어있어야하며<dao>에 선언된 interface 호출시 구현된 객체가 생성된다.
* 리턴받을시 interface 타입의 받기 때문에 BbsImple로 받는것이 아니라 반드시 Bbs로 받아서 캐스팅을 해줘야한다.
* */
Bbs bbs = (Bbs)DaoService.getDao(Bbs.class);
arr_list = bbs.getAllBbs(); //전체 게시물을 불러옴
rowTotal = arr_list.size();
blockList = 7;
blockPage = 5;
/*페이징 기법에 의한 현재 보여질 게시물들 결정*/
page = new Paging(nowPage,rowTotal,blockList,blockPage);
pagingCode = page.getSb().toString(); //페이징 기법의 HTML문장
/* 현재 페이지에서 보여질 게시물들 선별*/
int to = rowTotal;
if(page.getEndRow()<rowTotal)
to = page.getEndRow()+1;
list = arr_list.subList(page.getStartRow(), to);
return SUCCESS;
}
// 그외에 일반적으로 필드에 선언된 setter/getter 메서드 정의
}
*Paging.java
- paging처리하는 클래스
package page;
public class Paging {
private boolean isPrevPage,isNextPage;
private int nowPage,rowTotal,blockList,blockPage,totalPage,startPage,endPage,startRow,endRow;
private StringBuffer sb;
//페이징 기법을 총괄해서 계산하는 생성자
public Paging(int nowPage, int rowTotal, int blockList, int blockPage) {
/* 각종 플래그를 초기화*/
isPrevPage = false;
isNextPage = false;
/* 입력된 전체 게시물의 수를 통하여 전체 페이지 수를 구한다.*/
/* 아래 코드와 ceil을 이용한 전체페이지수를 구하는것은 같은 코드이다.
totalPage = rowTotal/blockList;
if(rowTotal%blockList !=0)
totalPage++;
*/
/* Math.ceil메서드는 인자의 수를 가지고 가장 가까운 값으로 올림을 한다. */
totalPage = (int)Math.ceil((double)rowTotal/(double)blockList);
/* 현재 페이지가 전체페이지수 보다 클경우 전체페이지 수로 할당 */
if(nowPage > totalPage)
nowPage = totalPage;
/* 현재 페이지에 따른 시작 행의 정보와 끝 행의 정보 */
startRow = (nowPage -1)*blockList;
endRow = startRow + blockList -1;
/* 시작 페이지와 마지막 페이지 값을 구한다.*/
startPage = (int)((nowPage -1) / blockPage)*blockPage+1 ;
endPage = startPage + blockPage -1 ;
/* 마지막 페이지 값이 전체 페이지 수보다 클 경우*/
if(endPage > totalPage)
endPage = totalPage;
/* 시작 페이지가 1보다 클 경우 이전 페이징 기능을 활성화 있도록 flag 설정*/
if(startPage>1)
isPrevPage = true;
/* 마지막 페이가 전체 페이지 수보다 작을 경우 다음 페이징 기능을 활성화*/
if(endPage<totalPage)
isNextPage = true;
/*멤버 변수에 값 저장*/
this.nowPage = nowPage;
this.rowTotal = rowTotal;
this.blockList = blockList;
this.blockPage = blockPage;
/*HTML문장 만들기*/
sb = new StringBuffer();
if(startPage < blockPage)
sb.append("<img src='images/button/but_prev.gif' width='30' height='9'>");
else{
sb.append("<img src='images/button/but_prev.gif' width='30' height='9' ");
sb.append("onclick='location.href=\"list.action?nowPage=");
sb.append(nowPage-blockPage);
sb.append("\"' style='cursor:hand'>");
}
sb.append("|");
for(int i = startPage; i<=endPage ; i++){
if( i < totalPage)
break;
if(i == nowPage){
sb.append(" <b><font color='#91B7EF'>");
sb.append(i);
sb.append("</font></b>");
}else{
sb.append("%nbsp;<a href='list.action?nowPage=");
sb.append(i);
sb.append("'>");
sb.append(i);
sb.append("</a>");
}
}
sb.append(" |");
if(startPage < totalPage)
sb.append("<img src='images/button/but_next.gif' width='30' height='9'>");
else{
sb.append("<img src='images/button/but_next.gif' width='30' height='9' ");
sb.append("onclick='location.href=\"list.action?nowPage=");
sb.append(nowPage+blockPage);
sb.append("\"' style='cursor:hand'>");
}
}
// 그외에 일반적으로 필드에 선언된 setter/getter 메서드 정의
}
설정
트랙백
댓글
글
struts2] Interceptor
Interceptor
개념
- 액션 단위의 작업을 수행할 때 기존 액션 처리 전과 후에 추가적인 작업을 지원하기 위한 방법을 제공
flow
- FliterDispatcher 실행후 Interceptor 호출 -> Action -> Interceptor -> FilterDispatcher
종류
- param : 요청파라미터를 액션에 저장
- prepare : 액션이 Preparable 인터페이스를 구현하였다면 prepre()메소드 호출
- model-driven : 액션이 ModelDriven인터페이스를 구현하였다면 getModel() 메소드 호출
간단한 interceptor활용 예
1. struts 환경구성
- struts.xml에 action 및 interceptor정의
-struts.properties 정의
* struts.xml
<?xml version="1.0" encoding="UTF-8"?>
<!DOCTYPE struts PUBLIC '-//Apache Software Foundation//DTD Struts Configuration 2.0//EN'
'http://struts.apache.org/dtds/struts-2.0.dtd'>
<struts>
<package name="defalut" extends="struts-default" namespace="">
<interceptors>
<interceptor name="MyInterceptor" class="interceptors.MyInterceptor"></interceptor>
</interceptors>
<action name="f3">
<result>/ex1/form3.jsp</result>
</action>
<action name="form3" class="ex1.FormAction3">
<interceptor-ref name="prepare"/><!--1첫째수행됨, 사용자가 원하는 객체를 생성 -->
<interceptor-ref name="modelDriven"/><!--2번째 수행됨, 위의 객체를 ValueStack에 적재 -->
<interceptor-ref name="params"/><!-- 3번째 수행됨,ValueStack에 가장 위에 있는 객체에 파라미터를 저장 -->
<result>/ex1/res3.jsp</result>
</action>
<action name="myInter" class="ex1.InterTestAction">
<interceptor-ref name="MyInterceptor"/>
<interceptor-ref name="logger"/>
<result>/ex1/res4.jsp</result>
</action>
</package>
</struts>
* struts.xml
# To change this template, choose Tools | Templates
# and open the template in the editor.
struts.i18n.reload=true
struts.devMode=true
struts.configuration.xml.reload=true
struts.continuations.package=org.apache.struts2.showcase
struts.custom.i18n.resources=globalMessages
struts.url.http.port=9000
struts.action.extension=action
struts.serve.static=true
struts.serve.static.browserCache=false
struts.mulipart.maxSize=2097252
* form3.jsp
- struts.xml에 정의한 action name인 f3.action 실행시 form3.jsp페이지 호출
- form3.jsp호출후 action안에 정의한 interceptor실행
interceptor실행순서 : prepare -> modelDriven -> params
- interceptor가 모두 수행되면 action 실행
<%@ page language="java" contentType="text/html; charset=UTF-8"
pageEncoding="UTF-8"%>
<%@ taglib prefix="s" uri="/struts-tags" %>
<body>
<s:form action="form3" method="post" theme="simple">
Name : <s:textfield name="name"/><br/>
Phone : <s:textfield name="phone"/><br/>
<s:submit value="Send"/>
</s:form>
</body>
*FormAction3.java
- interceptor에 정의한 params에 의해서 폼으로 부터 넘겨온 파라미터값을 valuestack에 올림
- 따라서 Action클래스가 불려질때 form으로 부터 파라미터값들이 넘어옴
package ex1;
import com.opensymphony.xwork2.ModelDriven;
import com.opensymphony.xwork2.Preparable;
public class FormAction3 implements Preparable,ModelDriven{
String msg;
Personal p;
public String getMsg() {
return msg;
}
public void setMsg(String msg) {
this.msg = msg;
}
public Personal getP() {
return p;
}
public void setP(Personal p) {
this.p = p;
}
public String execute() throws Exception{
msg = p.getName()+" 정보를 DB저장 완료";
//interceptor 에서 이미 객체를 valuestrack올렸기때문에 여기서 p.getName()으로 호출이 가능
return "success";
}
public void prepare() throws Exception {
/*
* prepare는 내가 원하는 객체를 생성하는것이 목적
* execute()가 불려지기 전에 prepare()메서드가 먼저 불려진다.
*/
p = new Personal();
}
@Override
public Object getModel() {
/*
* 여기서 반환되는 객체가 ValueStack에 올라간다.
* */
return p;
}
}
*res3.jsp
<%@ page language="java" contentType="text/html; charset=UTF-8"
pageEncoding="UTF-8"%>
<!DOCTYPE html PUBLIC "-//W3C//DTD HTML 4.01 Transitional//EN" "http://www.w3.org/TR/html4/loose.dtd">
<%@ taglib prefix="s" uri="/struts-tags" %>
<html>
<head>
<meta http-equiv="Content-Type" content="text/html; charset=UTF-8">
<title>Insert title here</title>
</head>
<body>
내용 : <s:property value="msg"/>
</body>
</html>
*MyInterceptor.java
- interceptor를 사용자가 만들어서 아래와 같은 방법으로 사용할수있다.
- 사용자가 만들시에는 AbstractInterceptor 클래스를 상속받아야하고 intercept(ActionInvocation ai)
메서드를 재정의 하면된다.
package interceptors;
import org.apache.commons.logging.Log;
import org.apache.commons.logging.LogFactory;
import com.opensymphony.xwork2.ActionInvocation;
import com.opensymphony.xwork2.interceptor.AbstractInterceptor;
public class MyInterceptor extends AbstractInterceptor{
private static Log log = LogFactory.getLog(MyInterceptor.class);
@Override
public String intercept(ActionInvocation ai) throws Exception {
log.info("실행전");
String res = ai.invoke(); // 16행
/*
* 현재 인터셉터가 마지막 인터셉터라면 이때 Action이 호출된다.
* 결국 invoke()메서드를 중심으로 해서 16행전을 [전처리부] 16행 이후를 후처리부라 한다.
* */
log.info(res+"실행후");
return res;
}
}
*InterTestAction.java
- 테스트용 action 클래스
package ex1;
public class InterTestAction {
private String msg;
public String getMsg() {
return msg;
}
public String execute() throws Exception{
msg = "Just Do It";
return "success";
}
}
설정
트랙백
댓글
글
struts2] struts2 + ibatis 활용한 게시판1-1
struts2 + ibatis 를 활용한 게시판
- struts2 framework 와 ibatis를 연동한 게시판 구축
- struts2 action클래스와 paging처리하는부분은 2페이지에 걸쳐 작성
1. 환경설정
- struts2,ibatis,oracle library 등록(web-inf/lib)
2. struts.xml
- aciton 등록
3. web.xml
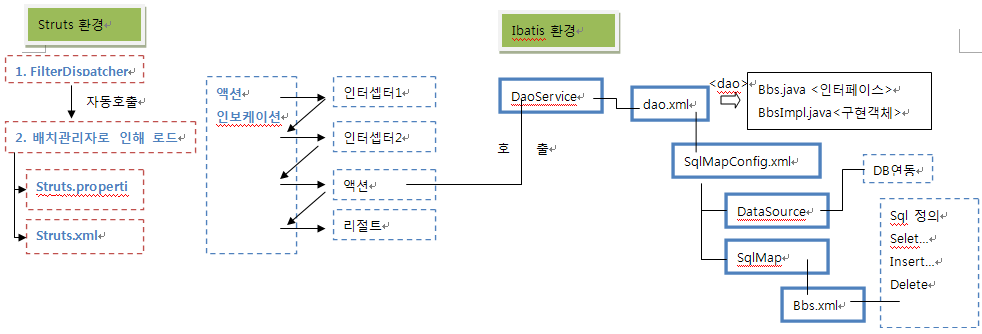
- struts환경에서는 사용자가 action요청시 가장 먼저 FilterDispatcher가 호출되고 위에 그림처럼
배치관리자로 인해 struts.xml 파일과 struts.properties 파일이 자동으로 호출되게 된다
<filter>
<filter-name>struts2</filter-name>
<filter-class>org.apache.struts2.dispatcher.FilterDispatcher</filter-class>
</filter>
<filter-mapping>
<filter-name>struts2</filter-name>
<url-pattern>/*</url-pattern>
</filter-mapping>
4. DaoService.java
- 데이타베이스 접속하기위한 DaoManager 를 반환하는 DaoService클래스 작성
- 싱글턴패턴으로 만들어서 하나의 DaoManager를 공유
* struts.xml
- 반드시 src 기본경로에 존재하여야 struts에서 인식할수있다.
- web.xml에서 등록한 필터가 읽혀진후 해당 xml문서가 읽혀진다.
<?xml version="1.0" encoding="UTF-8"?>
<!DOCTYPE struts PUBLIC '-//Apache Software Foundation//DTD Struts Configuration 2.0//EN'
'http://struts.apache.org/dtds/struts-2.0.dtd'>
<struts>
<package name="defalut" extends="struts-default" namespace="">
<action name="list" class="action.ListAction">
<result>/list.jsp</result>
</action>
</package>
</struts>
* DaoService.java
- DaoService는 한번만 읽혀져서 하나만 생성되어 DaoManager는 한개만 생성된다.
package dao;
import java.io.Reader;
import com.ibatis.common.resources.Resources;
import com.ibatis.dao.client.Dao;
import com.ibatis.dao.client.DaoManager;
import com.ibatis.dao.client.DaoManagerBuilder;
public class DaoService {
private static DaoManager daoManager;
private static DaoManager getDaoManager(){
String daoXmlResouce = "dao.xml"; //src폴더에 dao.xml
Reader reader = null;
if(daoManager ==null) //static으로 선언되어있기때문에 null 체크를 해서 null일경우만 생성
try {
reader = Resources.getResourceAsReader(daoXmlResouce); //dao.xml파일로부터 읽음
daoManager = DaoManagerBuilder.buildDaoManager(reader);
} catch (Exception e) {
e.printStackTrace();
}
return daoManager;
}
//실제 서버에서 dao객체가 필요할 경우 호출하는 메서드
public static Dao getDao(Class inter){
return getDaoManager().getDao(inter);
}
}
* dao.xml
- 사용하고자하는 dao interface 및 dao를 구현하고 있는 dao 를 명시
<?xml version="1.0" encoding="UTF-8"?>
<!DOCTYPE daoConfig PUBLIC "-//ibatis.apache.org//DTD DAO Configuration 2.0//EN" "http://ibatis.apache.org/dtd/dao-2.dtd">
<daoConfig>
<context id="sqlMap">
<transactionManager type="SQLMAP">
<property name="SqlMapConfigResource" value="config/SqlMapConfig.xml"/>
</transactionManager>
<dao interface="dao.Bbs" implementation="dao.BbsImpl"/>
</context>
</daoConfig>
* SqlMapConfig.xml
- 사용하는 database 환경설정이 필요한 파일이다(여기서는 oracle을 사용)
<!DOCTYPE sqlMapConfig PUBLIC '-//ibatis.apache.org/DTD SQL Map Config 2.0//EN'
'http://ibatis.apache.org/dtd/sql-map-config-2.dtd'>
<sqlMapConfig>
<properties resource="config/sqlMapConfig.properties" />
<transactionManager type="JDBC" commitRequired="false">
<dataSource type="SIMPLE">
<property name="JDBC.Driver" value="${driver}" /> //라이브러리(odbc14.jar)파일이 필요
<property name="JDBC.ConnectionURL" value="${url}" />
<property name="JDBC.Username" value="${user}" />
<property name="JDBC.Password" value="${pwd}" />
</dataSource>
</transactionManager>
<sqlMap resource="config/bbs.xml" />
</sqlMapConfig>
* SqlMapConfig.properties
- 보안을 위해 db접속정보를 따로 파일로 만들어둠
driver=oracle.jdbc.driver.OracleDriver
url=jdbc:oracle:thin:@localhost:1521:ORCL
user=SCOTT
pwd=TIGER
* Bbs.java(Interface)
- 사용자가 호출할수 있는 기능적요소들을 명시
package dao;
import java.util.ArrayList;
import vo.BbsVO;
public interface Bbs {
public ArrayList<BbsVO> getAllBbs();
}
* BbsImpl.java
- 위의 인터페이스를 구현하고 SqlMapDaoTemplate 를 상속받는 클래스
- 반드시 디폴트 생성자만 있으면 안되고 반드시 SqlMapDaoTemplate를 상속받고
DaoManager를 인자로 받는 생성자를 만들어야 한다.
- struts환경에서 여기에 정의된 메소드를 호출하게되면 결과를 받을수 있게 된다.
ex> getAllBbs()
* BbsVO.java
- DataBase에 있는 컬럼명과 동일한이름으로 멤버 변수로 정의
- 정의된 멤버변수의 setter/getter 메서드를 정의
* bbs.xml
- SqlMapConifg.xml 안에 <sqlMap>에 정의된 xml문서
- 이 안에 정의된 <select> 요소의 속성 id는 값은 BbsImple.java클래스의 queryForList("") 이안에
들어가는 인자값(String)과 동일해야 한다. ex> select id="selectAllBbs"
<?xml version="1.0" encoding="UTF-8"?>
<!DOCTYPE sqlMap PUBLIC '-//ibatis.apache.org//DTD SQL Map 2.0//EN' 'http://ibatis.apache.org/dtd/sql-map-2.dtd'>
<sqlMap namespace="memo">
<typeAlias alias="bbsvo" type="vo.BbsVO"/>
<select id="selectAllBbs" resultClass="bbsvo">
select * from bbs_t order by idx desc
</select>
</sqlMap>
* ListAction.java
- struts 액션 클래스로서 ActionSupport를 상속
- pojo기반으로 사용하게되면 session처리하는데 어려움이 있기때문에 ActionSupport를 상속
- ListAction에서 ibatis DaoService에 정의된 메소드를 호출하게되면 해당 객체를 얻어낼수있다.
ex> Bbs bbs = (Bbs)DaoService.getDao(Bbs.class);
설정
트랙백
댓글
글
struts2] Download
Download
1. web.xml
- 필터등록(위에서 설정한 부분과 동일)
2. struts.properties
- struts환경설정 파일 (위에서 설정한 부분과 동일)
3. struts.xml
- result type에 결과를 stream으로 받기 때문에 stream으로 설정
- param 요소에 mimeType,원 자원의 길이, 컨텐츠헤더값, inputStream이름, 버퍼크기 설정
<?xml version="1.0" encoding="UTF-8"?>
<!DOCTYPE struts PUBLIC '-//Apache Software Foundation//DTD Struts Configuration 2.0//EN'
'http://struts.apache.org/dtds/struts-2.0.dtd'>
<struts>
<package name="defalut" extends="struts-default" namespace="">
<action name="fileList" class="ex1.FileListAction">
<result>/ex1/fileList.jsp</result>
</action>
<action name="fileDownload" class="ex1.FileDownLoadAction">
<result type="stream">
<param name="contentType">bynary/octet-stream</param> // mimeType
<param name="contentLength">${contentLength}</param> // 원자원의 길이
<param name="contentDisposition">${contentDisposition}</param>
<!-- 파일의 이름을 설정하기 위한 컨텐츠헤더값 지정-->
<param name="inputName">input</param> // inputStream 이름
<param name="bufferSize">4096</param> // 버퍼 크기
</result>
</action>
</package>
</struts>
4. fileList.jsp
<%@ page language="java" contentType="text/html; charset=UTF-8" pageEncoding="UTF-8"%>
<%@ taglib prefix="s" uri="/struts-tags" %>
<h2>파일 목록</h2>
<s:property value="basePath"/>
<s:iterator value="fileList" status="stat">
/*
FileListAction 클래스로부터 받은 basePath를 param에 등록하고, fileName에 파일명을 등록
url에 해당 param을 등록하고 href요소에 url id를 맵핑시켜 사용자가 파일클릭시
fileDownload Action클래스를 수행하게하여 파일 다운로드가 수행되게 된다.
*/
<s:url id="download" action="fileDownload">
<s:param name="basePath" value="basePath"/>
<s:param name="fileName" >
<s:property value="fileList[#stat.index].name"/>
</s:param>
</s:url>
<li><s:a href="%{download}">
<s:property value="fileList[#stat.index].name"/>
</s:a>
</li>
</s:iterator>
5. FileListAction.java
- ActionSupport를 상속받는 action 클래스 등록
- properties파일에서 읽어올시 액션 파일명과 동일하게 작성하여 동일위치에 생성
package ex1;
import java.io.File;
import java.util.ArrayList;
import com.opensymphony.xwork2.ActionSupport;
public class FileListAction extends ActionSupport {
private ArrayList<File> fileList = new ArrayList<File>();
private String basePath;
// 필드에 선언된 setter/getter 메서드 정의
@Override
public String execute() throws Exception {
basePath = getText("path"); //프로퍼티파일에서 읽혀짐
//basePath = "D:/jspwork/struts2_FileUpload/WebContent/fileUpload";
/*
파일들이 저장되어 있는 폴더를 File객체로 생성한다.
이유는 그렇게 해야 그안에 있는 파일들을 가져와서 ArrayList에 저장할 수 있다.
내부의 모든 요소들을 반복하여 파일인지 아닌지를 비교하고 비교후 파일일경우 list에 추가
*/
File dir = new File(basePath);
File[] files = dir.listFiles();
if(files!=null && files.length>0)
for(File f : files)
if(f.isFile())
fileList.add(f);
return SUCCESS;
}
}
6. FileDownLoadAction.java
- 사용자가 파일명클릭시 수행되는 ActionClass(다운로드가 수행되는 ActionClass)
- struts.xml에 등록한것처럼 결과를 steam으로 전달하여 파일다운로드가 이루어짐
package ex1;
import java.io.File;
import java.io.FileInputStream;
import java.io.InputStream;
import java.net.URLEncoder;
import com.opensymphony.xwork2.ActionSupport;
public class FileDownLoadAction extends ActionSupport{
private String basePath,fileName,contentType,contentDisposition;
private InputStream input;
private long contentLength;
// 필드에 선언된 setter/getter 메서드 정의
@Override
public String execute() throws Exception {
/* jsp페이지에서 taglib에 설정된 param name(value값)이 전달됨 */
String path = basePath + System.getProperty("file.separator") + fileName;
File f = new File(path);
setContentLength(f.length());
setContentDisposition("attachment; filename=" + URLEncoder.encode(fileName, "utf-8"));
setInput(new FileInputStream(path));
return SUCCESS;
}
}
설정
트랙백
댓글
글
struts2] multi upload
Multi Upload
1. web.xml 필터 등록
- singleupload에서 설정한것과 동일
2.struts.xml / struts.properties 설정
<?xml version="1.0" encoding="UTF-8"?>
<!DOCTYPE struts PUBLIC '-//Apache Software Foundation//DTD Struts Configuration 2.0//EN'
'http://struts.apache.org/dtds/struts-2.0.dtd'>
<struts>
<package name="defalut" extends="struts-default" namespace="">
<action name="multiUpload">
<result>/ex2/multiUpload.jsp</result>
</action>
<action name="multiUpload_ok" class="ex2.MultiUploadAction">
<result name="input">/ex2/multiUpload.jsp</result>
<result>/ex2/multiUploadResult.jsp</result>
</action>
</package>
</struts>
3. FileService.java
- 파일에 관한 처리가 이루어지는 클래스(저장폴더 생성 및 파일저장작업이 이루어지는 메서드정의)
package ex1;
import java.io.File;
import java.io.FileInputStream;
import java.io.FileOutputStream;
public class FileService {
/*
파일들이 저장될 폴더를 생성하는 메서드
폴더가 존재하지않을경우 폴더생성
*/
public void makeBasePath(String n){
File dir = new File(n);
if(!dir.exists())
dir.mkdirs();
}
/*
File, 저장경로(basePath),파일명을 인자로 받는 메서드
*/
public String saveFile(File file, String basePath, String fileName) throws Exception{
if(file == null || file.getName().equals("")||file.length()<1)
return null;
makeBasePath(basePath); // 저장될 폴더 생성! 폴더존재시 수행하지않음
String serverFullPath = basePath + System.getProperty("file.separator") + fileName; //파일명이 포함된 절대경로
FileInputStream fis = new FileInputStream(file); // 저장할 파일에 스트림 생성
/*
이제 위에 있는 스트림을 통해 읽은 자원을 저장할 스트림 생성
FileOutputStream은 경로만 존재한다면 그 위치에 파일이 있든 없든 무조건 파일을 만든다.
*/
FileOutputStream fos = new FileOutputStream(serverFullPath);
/*
위에서 생성한 빈파일이 서버측에 생성되었으므로 준비된 스트림을 통하여 채워넣는다.
*/
int readSize = 0 ;
byte[] buf = new byte[1024];
while((readSize = fis.read(buf))!=-1){
fos.write(buf, 0, readSize); //준비된 스트림을 통해 쓴다.
}
fos.close();
fis.close();
return serverFullPath;
}
}
4. multiUpload.jsp
<%@ page language="java" contentType="text/html; charset=UTF-8" pageEncoding="UTF-8"%>
<%@ taglib prefix="s" uri="/struts-tags"%>
<s:actionerror/>
<font color="red"><s:fielderror/></font><!-- 유효성 검사 오류시 표현 -->
<s:form method="post" action="multiUpload_ok" enctype="multipart/form-data" theme="simple">
<b>멀티 파일 업로드 </b><hr>
File 1 : <s:file name="upload"/><br> //파일명을 동일하게 설정
File 2 : <s:file name="upload"/><br>
File 3 : <s:file name="upload"/><br>
<s:submit/>
</s:form>
5. MultiUploadAction.java
- ActionSupport 클래스를 상속받은 action클래스
- action클래스 (일반적인 setter/getter, execute()메소드로 구성됨)
- jsp페이지에서 action클래스가 불려질때 폼에서 전달된 값과 함께 자동적으로 execute()메서드가 호출됨
package ex2;
import java.io.File;
import com.opensymphony.xwork2.ActionSupport;
import ex1.FileService;
public class MultiUploadAction extends ActionSupport {
private File[] upload; // 멀티 업로드의 경우 배열로 받아 처리
private String[] uploadFileName,uploadContentType,serverFullPath;
public String execute() throws Exception{
serverFullPath = new String[upload.length];
//String basePath = getText("upload_folder"); //아래에 설정한 properties파일에서 내용을 가져옴
String basePath = "D:/jspwork/struts2_FileUpload/WebContent/fileUpload";
FileService fileService = new FileService();
for(int i =0 ; i<upload.length; i++){
serverFullPath[i] = fileService.saveFile(upload[i], basePath, uploadFileName[i]);
}
return SUCCESS;
}
}
6. MultiUploadAction.properties
- properties파일을 이용하여 값을 받아오게 설정할수 있다.
(action클래스명.xml 형식으로 작성시 struts에서 자동으로 호출됨)
upload_folder = D:/jspwork/struts2_FileUpload/WebContent/fileUpload
7. multiUploadResult.jsp
<%@ page language="java" contentType="text/html; charset=UTF-8"
pageEncoding="UTF-8"%>
<%@ taglib prefix="s" uri="/struts-tags" %>
<html>
<head>
<meta http-equiv="Content-Type" content="text/html; charset=UTF-8">
<title>MultiUpload</title>
</head>
<body>
<h2> 멀티 파일 업로드 결과 </h2>
<s:iterator value="upload" status="stat">
/*
<s:property>선언시 자동적으로 action클래스에 getter메서드가 호출됨
배열로 받기 때문에 iterator를 이용하여 출력
*/
<li>파일 <s:property value="%{#stat.index+1}"/></li>
<li>컨텐츠 타입<s:property value="%{uploadContentType[#stat.index]}"/></li>
<li>로컬 파일 이름<s:property value="%{uploadFileName[#stat.index]}"/></li>
<li>서버 전체 경로<s:property value="%{serverFullPath[#stat.index]}"/></li>
<li>임시 파일 이름<s:property value="%{upload[#stat.index]}"/></li>
<hr>
</s:iterator>
</body>
</html>
설정
트랙백
댓글
글
struts2] single upload
Single Upload
1. web.xml 필터 등록
<filter>
<filter-name>struts2</filter-name>
<filter-class>org.apache.struts2.dispatcher.FilterDispatcher</filter-class>
</filter>
<filter-mapping>
<filter-name>struts2</filter-name>
<url-pattern>/*</url-pattern>
</filter-mapping>
2.struts.xml / struts.properties 설정
<?xml version="1.0" encoding="UTF-8"?>
<!DOCTYPE struts PUBLIC '-//Apache Software Foundation//DTD Struts Configuration 2.0//EN'
'http://struts.apache.org/dtds/struts-2.0.dtd'>
<struts>
<package name="defalut" extends="struts-default" namespace="">
<action name="singleUpload">
<result>/ex1/singleUpload.jsp</result>
</action>
<action name="singleUpload_ok" class="ex1.SingleUploadAction">
<result name="input">/ex1/singleUpload.jsp</result>
<result>/ex1/singleUploadResult.jsp</result>
</action>
</package>
</struts>
3. FileService.java
- 파일에 관한 처리가 이루어지는 클래스(저장폴더 생성 및 파일저장작업이 이루어지는 메서드정의)
package ex1;
import java.io.File;
import java.io.FileInputStream;
import java.io.FileOutputStream;
public class FileService {
/*
파일들이 저장될 폴더를 생성하는 메서드
폴더가 존재하지않을경우 폴더생성
*/
public void makeBasePath(String n){
File dir = new File(n);
if(!dir.exists())
dir.mkdirs();
}
/*
File, 저장경로(basePath),파일명을 인자로 받는 메서드
*/
public String saveFile(File file, String basePath, String fileName) throws Exception{
if(file == null || file.getName().equals("")||file.length()<1)
return null;
makeBasePath(basePath); // 저장될 폴더 생성! 폴더존재시 수행하지않음
String serverFullPath = basePath + System.getProperty("file.separator") + fileName; //파일명이 포함된 절대경로
FileInputStream fis = new FileInputStream(file); // 저장할 파일에 스트림 생성
/*
이제 위에 있는 스트림을 통해 읽은 자원을 저장할 스트림 생성
FileOutputStream은 경로만 존재한다면 그 위치에 파일이 있든 없든 무조건 파일을 만든다.
*/
FileOutputStream fos = new FileOutputStream(serverFullPath);
/*
위에서 생성한 빈파일이 서버측에 생성되었으므로 준비된 스트림을 통하여 채워넣는다.
*/
int readSize = 0 ;
byte[] buf = new byte[1024];
while((readSize = fis.read(buf))!=-1){
fos.write(buf, 0, readSize); //준비된 스트림을 통해 쓴다.
}
fos.close();
fis.close();
return serverFullPath;
}
}
4. singleUpload.jsp
<%@ page language="java" contentType="text/html; charset=UTF-8" pageEncoding="UTF-8"%>
<%@ taglib prefix="s" uri="/struts-tags"%>
<s:actionerror/>
<font color="red"><s:fielderror/></font><!-- 유효성 검사 오류시 표현 -->
<s:form method="post" action="singleUpload_ok" enctype="multipart/form-data">
<b>파일업로드 </b><hr>
<s:file name="upload"/>
<s:submit/>
</s:form>
5. SingleUploadAction.java
- ActionSupport 클래스를 상속받은 action클래스
- action클래스 (일반적인 setter/getter, execute()메소드로 구성됨)
- jsp페이지에서 action클래스가 불려질때 폼에서 전달된 값과 함께 자동적으로 execute()메서드가 호출됨
package ex1;
import java.io.File;
import com.opensymphony.xwork2.ActionSupport;
public class SingleUploadAction extends ActionSupport {
private File upload;
private String uploadFileName,uploadContentType,serverFullPath;
public String execute() throws Exception {
String basePath = "D:/jspwork/struts2_FileUpload/WebContent/fileUpload";
FileService fileService = new FileService();
serverFullPath = fileService.saveFile(upload, basePath, uploadFileName);
return SUCCESS;
}
}
6. SingleUploadAction-validation.xml
- validation 설정을 하는 부분(action클래스명-validation.xml 형식으로 작성시 struts에서 자동으로 호출됨)
<?xml version="1.0" encoding="UTF-8"?>
<!DOCTYPE validators PUBLIC '-//OpenSymphony Group //XWork Validator 1.0.2//EN' 'http://www.opensymphony.com/xwork/xwork-validator-1.0.2.dtd'>
<validators>
<field name="upload">
<field-validator type="fieldexpression">
<param name="expression">
<![CDATA[
upload.length() > 0
]]>
</param>
<message>
업로드할 파일을 선택하십시오.
</message>
</field-validator>
</field>
</validators>
7. SingleUploadResult.jsp
<%@ taglib prefix="s" uri="/struts-tags" %>
<html>
<head>
<meta http-equiv="Content-Type" content="text/html; charset=UTF-8">
<title>Insert title here</title>
</head>
<body>
<h2> 단일 파일 업로드 결과 </h2>
<li>컨텐츠 타입<s:property value="uploadContentType"/></li>
<li>로컬 파일 이름<s:property value="uploadFileName"/></li>
<li>서버 전체 경로입<s:property value="serverFullPath"/></li>
<li>임시 파일 이름<s:property value="upload"/></li>
</body>
</html>


RECENT COMMENT