검색결과 리스트
글
JDBC2.0 커서이동
/*
현재 프로그램은 콘솔창에서 실행되는 프로그램이다.
* 전체 -> 1 추가 ->2 삭제 ->3 종료->4
* 위의 메뉴에 따라 키보드로부터 값을 받아서 처리해야 한다.
rs.last() // 커서를 마지막으로 이동
rs.getRow(); // 테이블의 행의 갯수를 리턴함
아래코드는 넷빈으로 작성된 코드인데 ui부분은 swing의jTable을 이용하였다.
JDBC2.0 을 이용해서 커서를 제어하는 부분만 보면 도움이 될것이다.
테스트를 위한 SQL 스크립트파일 및 넷빈에서 돌려볼수있는 JAVA 소스 첨부
*/
import java.sql.CallableStatement;
import java.sql.Connection;
import java.sql.DriverManager;
 JDBC_JTable.java
 sql.txt
/*
* JDBC_JTable.java
*/
import java.sql.PreparedStatement;
import java.sql.ResultSet;
import java.sql.ResultSetMetaData;
import java.sql.Statement;
public class JDBC_JTable extends javax.swing.JFrame {
private Connection con;
private Statement stmt;
private PreparedStatement pstmt;
private CallableStatement cstmt;
private ResultSet rs;
int row_count,col_count;
public JDBC_JTable() {
initComponents();
setBounds(200,200,500,500);
connected();
}
private void connected(){
try {
Class.forName("oracle.jdbc.driver.OracleDriver");
con = DriverManager.getConnection("jdbc:oracle:thin:@localhost:1521:sg", "scott", "tiger");
/*
* Statement를 아래와 같이 만들어주는 이유는 아래의 Statement를 통하여 얻어지는 결과
* 객체(ResultSet)의 커서와 형태를 유동적 또는 유연하게 하기 위해 JDBC2.0 기술을 사용한다.
* ex> rs.last(); // 커서를 마지막 행으로 이동
* rs.beforeFirst(); // 커서를 첫행보다 앞으로 이동
* rs.first(); // 커서를 첫행으로 이동
*/
stmt = con.createStatement(ResultSet.TYPE_SCROLL_SENSITIVE,ResultSet.CONCUR_UPDATABLE);
pstmt = con.prepareStatement(
"insert into phone_values(phone_t_idx.nextvla,?,?,?)");
cstmt = con.prepareCall("{call del_phone(?)}");
setTitle("db연결완료");
} catch (Exception exception) {}
}
private void closed(){
try {
if(rs!=null)
rs.close();
if(stmt!=null)
stmt.close();
if(pstmt!=null)
pstmt.close();
if(cstmt !=null)
cstmt.close();
if(con !=null)
con.close();
} catch (Exception e) {
}
}
@SuppressWarnings("unchecked")
// <editor-fold defaultstate="collapsed" desc="Generated Code">
private void initComponents() {
jScrollPane1 = new javax.swing.JScrollPane();
table = new javax.swing.JTable();
jMenuBar1 = new javax.swing.JMenuBar();
jMenu1 = new javax.swing.JMenu();
jMenuItem1 = new javax.swing.JMenuItem();
jMenuItem2 = new javax.swing.JMenuItem();
jMenuItem3 = new javax.swing.JMenuItem();
jSeparator1 = new javax.swing.JSeparator();
jMenuItem4 = new javax.swing.JMenuItem();
setDefaultCloseOperation(javax.swing.WindowConstants.EXIT_ON_CLOSE);
table.setModel(new javax.swing.table.DefaultTableModel(
new Object [][] {
},
new String [] {
}
));
jScrollPane1.setViewportView(table);
getContentPane().add(jScrollPane1, java.awt.BorderLayout.CENTER);
jMenu1.setText("SQL");
jMenuItem1.setText("전체보기");
jMenuItem1.addActionListener(new java.awt.event.ActionListener() {
public void actionPerformed(java.awt.event.ActionEvent evt) {
jMenuItem1ActionPerformed(evt);
}
});
jMenu1.add(jMenuItem1);
jMenuItem2.setText("추가");
jMenu1.add(jMenuItem2);
jMenuItem3.setText("삭제");
jMenu1.add(jMenuItem3);
jMenu1.add(jSeparator1);
jMenuItem4.setText("종료");
jMenu1.add(jMenuItem4);
jMenuBar1.add(jMenu1);
setJMenuBar(jMenuBar1);
pack();
}// </editor-fold>
private void jMenuItem1ActionPerformed(java.awt.event.ActionEvent evt) {
try {
rs = stmt.executeQuery("select * from phone_t");
/*결과 객체의 커서를 마지막 행으로 이동*/
rs.last();
row_count = rs.getRow(); // 레코드의 수 (1차원 배열의 수);
rs.beforeFirst(); // 결과 객체의 커서를 원위치
/*컬럼 명들을 가져오기 위한 작업*/
ResultSetMetaData rsmd = rs.getMetaData(); // 열들의 대한 정보객체
col_count = rsmd.getColumnCount();
String[] f = new String[col_count];
for(int i = 0 ; i<f.length ; i++){
f[i] = rsmd.getColumnName(i+1);
}
/* 윗 부분까지가 컬럼 작업완료*/
/*db의 자원을 Object형 2차원 배열로 재포장 작업*/
Object[][] data = new Object[row_count][col_count];
/*
* 실제 자원은 ResultSet이 가지고 있으므로 그곳에 있는 자원들을
* data라는 2차원 배열의 각 요소에 넣어주면된다.
*/
for(int r =0;rs.next();r++){ // 레코드 수만큼
for(int c = 0;c<col_count;c++){ //컬럼의 수만큼 반복하는 반복문
data[r][c] = rs.getString(c+1);
System.out.println(data[r][c]);
}
}
table.setModel(new MyModel(data,f));
} catch (Exception exception) {
}
}
public static void main(String args[]) {
java.awt.EventQueue.invokeLater(new Runnable() {
public void run() {
new JDBC_JTable().setVisible(true);
}
});
}
// Variables declaration - do not modify
private javax.swing.JMenu jMenu1;
private javax.swing.JMenuBar jMenuBar1;
private javax.swing.JMenuItem jMenuItem1;
private javax.swing.JMenuItem jMenuItem2;
private javax.swing.JMenuItem jMenuItem3;
private javax.swing.JMenuItem jMenuItem4;
private javax.swing.JScrollPane jScrollPane1;
private javax.swing.JSeparator jSeparator1;
private javax.swing.JTable table;
// End of variables declaration
}
설정
트랙백
댓글
글
ORACLE9I] EXPORT / IMPORT
EXPORT : DB에있는 데이타를 OS DUMP파일로 만들어주는 툴
IMPORT : OS DUMP파일을 DB에 넣어주는 툴
이것을 이용해서 DB의 내용을 다른 DB로 이관시킬수도 있으며 매우 활용도가 높음..
EXPORT
: 1. 테이블 재구성 효과를 가진다.
2. tablespace 변경
3. DB간 데이타 전송용도
4. 소유권 변경
5. Backup 과 recovery 효과를 가진다.
IMPORT
:
============================================================================================
*export 명령어
c:\ exp help=y [도움말보는방법]
exp userid='sys/oracle as sysdba' full=y file=c:\f200807031635.dmp
exp userid=scott/tiger@db1 tables=msg file=c:\remote.dmp
-> full = y db전체의 내용을 가져오는 명령어
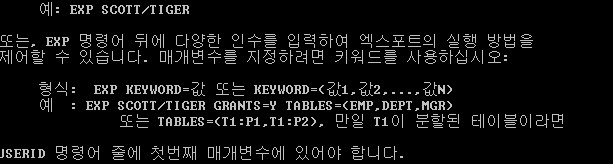
*import 명령어
imp help=y
imp userid='sys/oracle as sysdba' full=y file=c:\f200807031635.dmp
-> full = y 파일에 대한 전체에 대한 내용
imp userid='sys/oracle as sysdba' fromuser=scott touser=scott tables='emp' file=c:\f200807031635.dmp
-> scott계정의 emp테이블만 추출하여 import
imp userid=scott/tiger full=y tables=msg file=c:\remote.dmp
imp userid=scott/tiger@db1 full=y tables=msg file=c:\remote.dmp
설정
트랙백
댓글
글
JAVA 스윙 야구게임 프로그래밍
오랜전에 교육센터 있던 시절 심심해서 만들었던거 같은데...
오래전에 만든거라 지금 보면 코드가 지저분하네요...
참고용으로만 보시는게 좋을듯해요..
/*Baseball*/
import java.awt.*;
import javax.swing.*;
import java.awt.event.*;
import java.util.*;
public class Baseball extends JFrame {
JMenuBar bar ;
JMenu control;
JMenuItem replay;
JMenuItem show;
JMenuItem exit;
JPanel p;
JButton submit;
JTextField tf1,tf2,tf3;
JTextArea ta;
int strike;
int ball;
int attemp;
String msg ;
int[] array;
int[] userNo;
public Baseball(){
super("Baseball Game");
init();
event();
start();
this.setSize(300, 400);
Dimension screen = Toolkit.getDefaultToolkit().getScreenSize();
Dimension frm = super.getSize();
int xpos = (int) (screen.getWidth() / 2 -frm.getWidth() / 2);
int ypos = (int) (screen.getHeight() / 2 - frm.getHeight() / 2);
this.setLocation(xpos, ypos);
this.setVisible(true);
}
public void init(){
array = new int[3];
userNo = new int[3];
attemp =0 ;
this.setJMenuBar(bar = new JMenuBar());
this.add(p = new JPanel(),BorderLayout.NORTH);
this.add(ta = new JTextArea(),BorderLayout.CENTER);
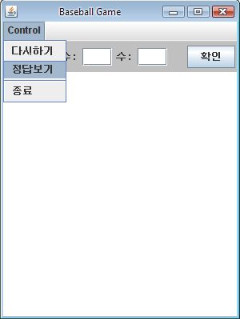
bar.add(control = new JMenu("Control"));
control.add(replay = new JMenuItem("다시하기"));
control.add(show = new JMenuItem("정답보기"));
control.addSeparator();
control.add(exit = new JMenuItem("종료"));
p.setLayout(new FlowLayout());
p.add(new JLabel("수 : "));
p.add(tf1 = new JTextField(3));
p.add(new JLabel("수 : "));
p.add(tf2 = new JTextField(3));
p.add(new JLabel("수 : "));
p.add(tf3 = new JTextField(3));
p.add(new JLabel(" "));
p.add(submit =new JButton("확인"));
p.setBackground(Color.lightGray);
}
/*이벤트를 발생시키는 내부클래스를 초기화하는 메소드*/
public void event(){
/*확인 버튼 누를시 게임시작 및 결과출력*/
submit.addActionListener(new ActionListener(){
public void actionPerformed(ActionEvent e){
userNo[0]=Integer.parseInt(tf1.getText());
userNo[1]=Integer.parseInt(tf2.getText());
userNo[2]=Integer.parseInt(tf3.getText());
/*각 필드에 같은 번호 입력체크*/
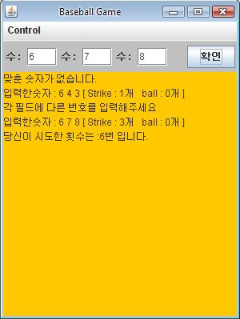
if(userNo[0]==userNo[1] || userNo[1]==userNo[2] || userNo[2]==userNo[0]){
ta.append("각 필드에 다른 번호를 입력해주세요\n");
return;
}
strike = 0;
ball = 0;
check();
attemp++; //시도한횟수 카운트
if(strike!=0 || ball !=0){
ta.append("입력한숫자 : "+userNo[0]+" "+userNo[1]+" "+userNo[2]+" [ "+"Strike : " + strike +"개"+ " ball : " + ball+"개 ]\n");
if(strike == 3){
ta.setBackground(Color.orange);
ta.append("당신이 시도한 횟수는 :" + attemp+"번 입니다. \n");
}
}else
ta.setText(msg);
}
});
/* 종료버튼 누를시 종료되는 이벤트*/
exit.addActionListener(new ActionListener(){
public void actionPerformed(ActionEvent e){
System.exit(0);
}
});
/*정답보기 이벤트*/
show.addActionListener(new ActionListener(){
public void actionPerformed(ActionEvent e){
ta.setText("포기하셨군요....ㅠ-ㅠ 정답은 : " +array[0]+array[1]+array[2]+"\n");
tf1.setText("");
tf2.setText("");
tf3.setText("");
}
});
/*게임다시 시작이벤트*/
replay.addActionListener(new ActionListener(){
public void actionPerformed(ActionEvent e){
ta.setText("");
tf1.setText("");
tf2.setText("");
tf3.setText("");
}
});
/* 윈도우 창 종료*/
this.addWindowListener(new WindowAdapter(){
public void windowClosing(WindowEvent e){
System.exit(0); //프로그램종료
}
});
}
/*시작시 랜덤하게 중복되지 않는 번호 받아오는 메소드*/
public void start(){
label:for(int i=0 ; i<array.length ; ){
array[i]=(int)(Math.random()*9+1);
for(int j=0 ;j<i ; j++){
if(array[j] == array[i])
continue label;
}
i++;
}
}
/*strike or ball 체크*/
public void check(){
for(int i = 0 ; i<array.length;i++){
for(int j = 0 ; j<array.length ; j++){
if(array[i]==userNo[j]){
if(i==j)
strike++;
else
ball++;
} //strike,ball check;
else
msg = "맞춘 숫자가 없습니다.\n";
} //inner for loop
} //outter for loop
}
public static void main(String[] args){
new Baseball();
}
}
설정
트랙백
댓글
글
flex3.0] Binding 바인딩 방법
플렉스에서는 바인딩할수있는 여러가지 방법이 있는데 바인딩 처리 방법입니다
Method1.
{} 를 이용한 방법
<mx:Application xmlns:mx="http://www.adobe.com/2006/mxml" layout="vertical" verticalAlign="middle"
horizontalAlign="center" backgroundGradientColors="[0x000000,0x323232]" viewSourceURL="srcview/index.html">
<mx:TextInput id="myTI" text="Type something here"/>
<mx:Text id="myText" text="{myTI.text}" color="white"/>
<mx:Text id="myTextUpper" text="{myTI.text.toUpperCase()}" color="white"/>
<mx:Text id="myTextLength" text="{myTI.text.length}" color="white"/>
</mx:Application>
{} 를 이용한 방법
<?xml version="1.0" encoding="utf-8"?>
<mx:Application xmlns:mx="http://www.adobe.com/2006/mxml" layout="vertical" verticalAlign="middle"
horizontalAlign="center" backgroundGradientColors="[0x000000,0x323232]">
<mx:Text text="Type into either field" color="white"/>
<mx:TextInput id="myTI1" text="{myTI2.text}"/>
<mx:TextInput id="myTI2" text="{myTI1.text}"/>
</mx:Application>
Method3.
<Binding > 테그를 이용한 방법
<?xml version="1.0" encoding="utf-8"?>
<mx:Application xmlns:mx="http://www.adobe.com/2006/mxml" layout="vertical" verticalAlign="middle"
horizontalAlign="center" backgroundGradientColors="[0x000000,0x323232]">
<mx:TextInput id="myTI" text="Type something here"/>
<mx:Text id="myText" color="white"/>
<mx:Binding source="myTI.text" destination="myText.text"/>
</mx:Application>
Method4.
ActionScript에서 BindingUtils.bindProperty를 이용한 바인딩
<?xml version="1.0"?>
<mx:Application xmlns:mx="http://www.adobe.com/2006/mxml" layout="vertical" verticalAlign="middle"
horizontalAlign="center" backgroundGradientColors="[0x000000,0x323232]">
<mx:Script>
<![CDATA[
import mx.binding.utils.*;
// Define data binding.
public function initBindingHandler():void {
BindingUtils.bindProperty(myText, "text", myTI, "text");
}
]]>
</mx:Script>
<mx:TextInput id="myTI" text="Type something here"/>
<mx:Text id="myText" preinitialize="initBindingHandler();" color="white"/>
</mx:Application>
Method5.
[Bindable]키워드를 이용한 바인딩
<?xml version="1.0"?>
<mx:Application xmlns:mx="http://www.adobe.com/2006/mxml" layout="vertical" verticalAlign="middle"
horizontalAlign="center" backgroundGradientColors="[0x000000,0x323232]">
<mx:Script>
<![CDATA[
// Define public vars for tracking temps.
[Bindable]
public var highTemp:Number = 90;
[Bindable]
public var lowTemp:Number = 55;
]]>
</mx:Script>
<mx:Text text="High: {highTemp} Low: {lowTemp}" color="white"/>
<mx:Button label="Winter Temps" click="highTemp=50; lowTemp=10;"/>
<mx:Button label="Summer Temps" click="highTemp=95; lowTemp=80;"/>
</mx:Application>
설정
트랙백
댓글
글
updateDisplayList() 알아보기
updataDisplayList() 메서드는 스타일에 관련 셋팅을 변경하거나 설정할때 호출되어지는 메서드이다.
플렉스에서는 addChild()를 하여 컨터이너에 콤포넌트를 추가하게되면 자동적으로 invalidateDisplayList()메서드를 호출하게 되고 이 메서드가 호출된후에 updataDisplayList()가 호출되어 시각화되게 되는것이다.
따라서 UIComponent 클래스를 구현한 모든 클래스에서는 스타일변경이 필요한경우에는 위의 메서드를 오버라이드해서 작업을 해주면된다.
protected function updateDisplayList(unscaledWidth:Number,
    unscaledHeight:Number):void
unscaledWidth Specifies the width of the component, in pixels, in the component's coordinates, regardless of the value of the scaleX property of the component. This is the width of the component as determined by its parent container.
unscaledHeight Specifies the height of the component, in pixels, in the component's coordinates, regardless of the value of the scaleY property of the component. This is the height of the component as determined by its parent container.
Scaling occurs in Flash Player, after updateDisplayList() executes. For example, a component with an unscaledHeight value of 100, and with a scaleY property of 2.0, appears 200 pixels high in Flash Player.
/*아래 일부코드는 updateDisplayList()메서드를 오버라이드한 일부 첨부파일중 일부 코드이다.*/
override protected function updateDisplayList(unscaledWidth:Number, unscaledHeight:Number):void
{
super.updateDisplayList(unscaledWidth, unscaledHeight);
if (data != null && listData != null && data[DataGridListData(listData).dataField] < 0)
{
setStyle("color", 0xFF0000);
}
else
{
setStyle("color", 0x009900);
}
}
자세한 내용은 아래 url을 참조
http://livedocs.adobe.com/flex/201/html/wwhelp/wwhimpl/common/html/wwhelp.htm?context=LiveDocs_Book_Parts&file=ascomponents_advanced_148_16.html
Sample>


RECENT COMMENT